Published on: 2/9/2026 by Shan Asif
Managing inventory manually is time-consuming.
Whether you’re running a small business, managing a warehouse, integrating barcode scanning in an e-commerce website as a developer, or tracking personal items, a barcode scanner can save hours of work.
But here’s the problem: traditional solutions require expensive hardware or native mobile apps.
What if you could build an inventory barcode scanner that works right in your web browser? No app downloads, no dedicated scanners, point your device’s camera at a product barcode, and let the system handle the rest.
That’s exactly what we’ll build in this tutorial.
What You’ll Build:
- A web-based inventory scanner that works on phones, tablets, and laptops
- Camera-based barcode detection using STRICH SDK
- Automatic product tracking with quantity management
- Smart duplicate detection that increments quantities
- A clean, professional interface built with React
Use Cases:
- Small business inventory management
- Warehouse stock tracking
- Retail point-of-sale systems
- Asset management for organizations
- Personal collection management
- Event check-in systems
Let’s dive in and build your inventory system from scratch.
What is STRICH?
Before we start coding, let’s understand the core technology we’ll use: STRICH.
STRICH is a JavaScript library for real-time barcode scanning in web browsers. Unlike open-source alternatives that struggle with accuracy and performance, STRICH provides enterprise-grade scanning capabilities that work across all major browsers and devices.
Key Features:
- No Native App Required: Everything runs in the browser, no app stores, no installations
- Fast & Accurate: Scans barcodes in milliseconds with high accuracy rates
- Universal Compatibility: Works on iOS, Android, and desktop browsers
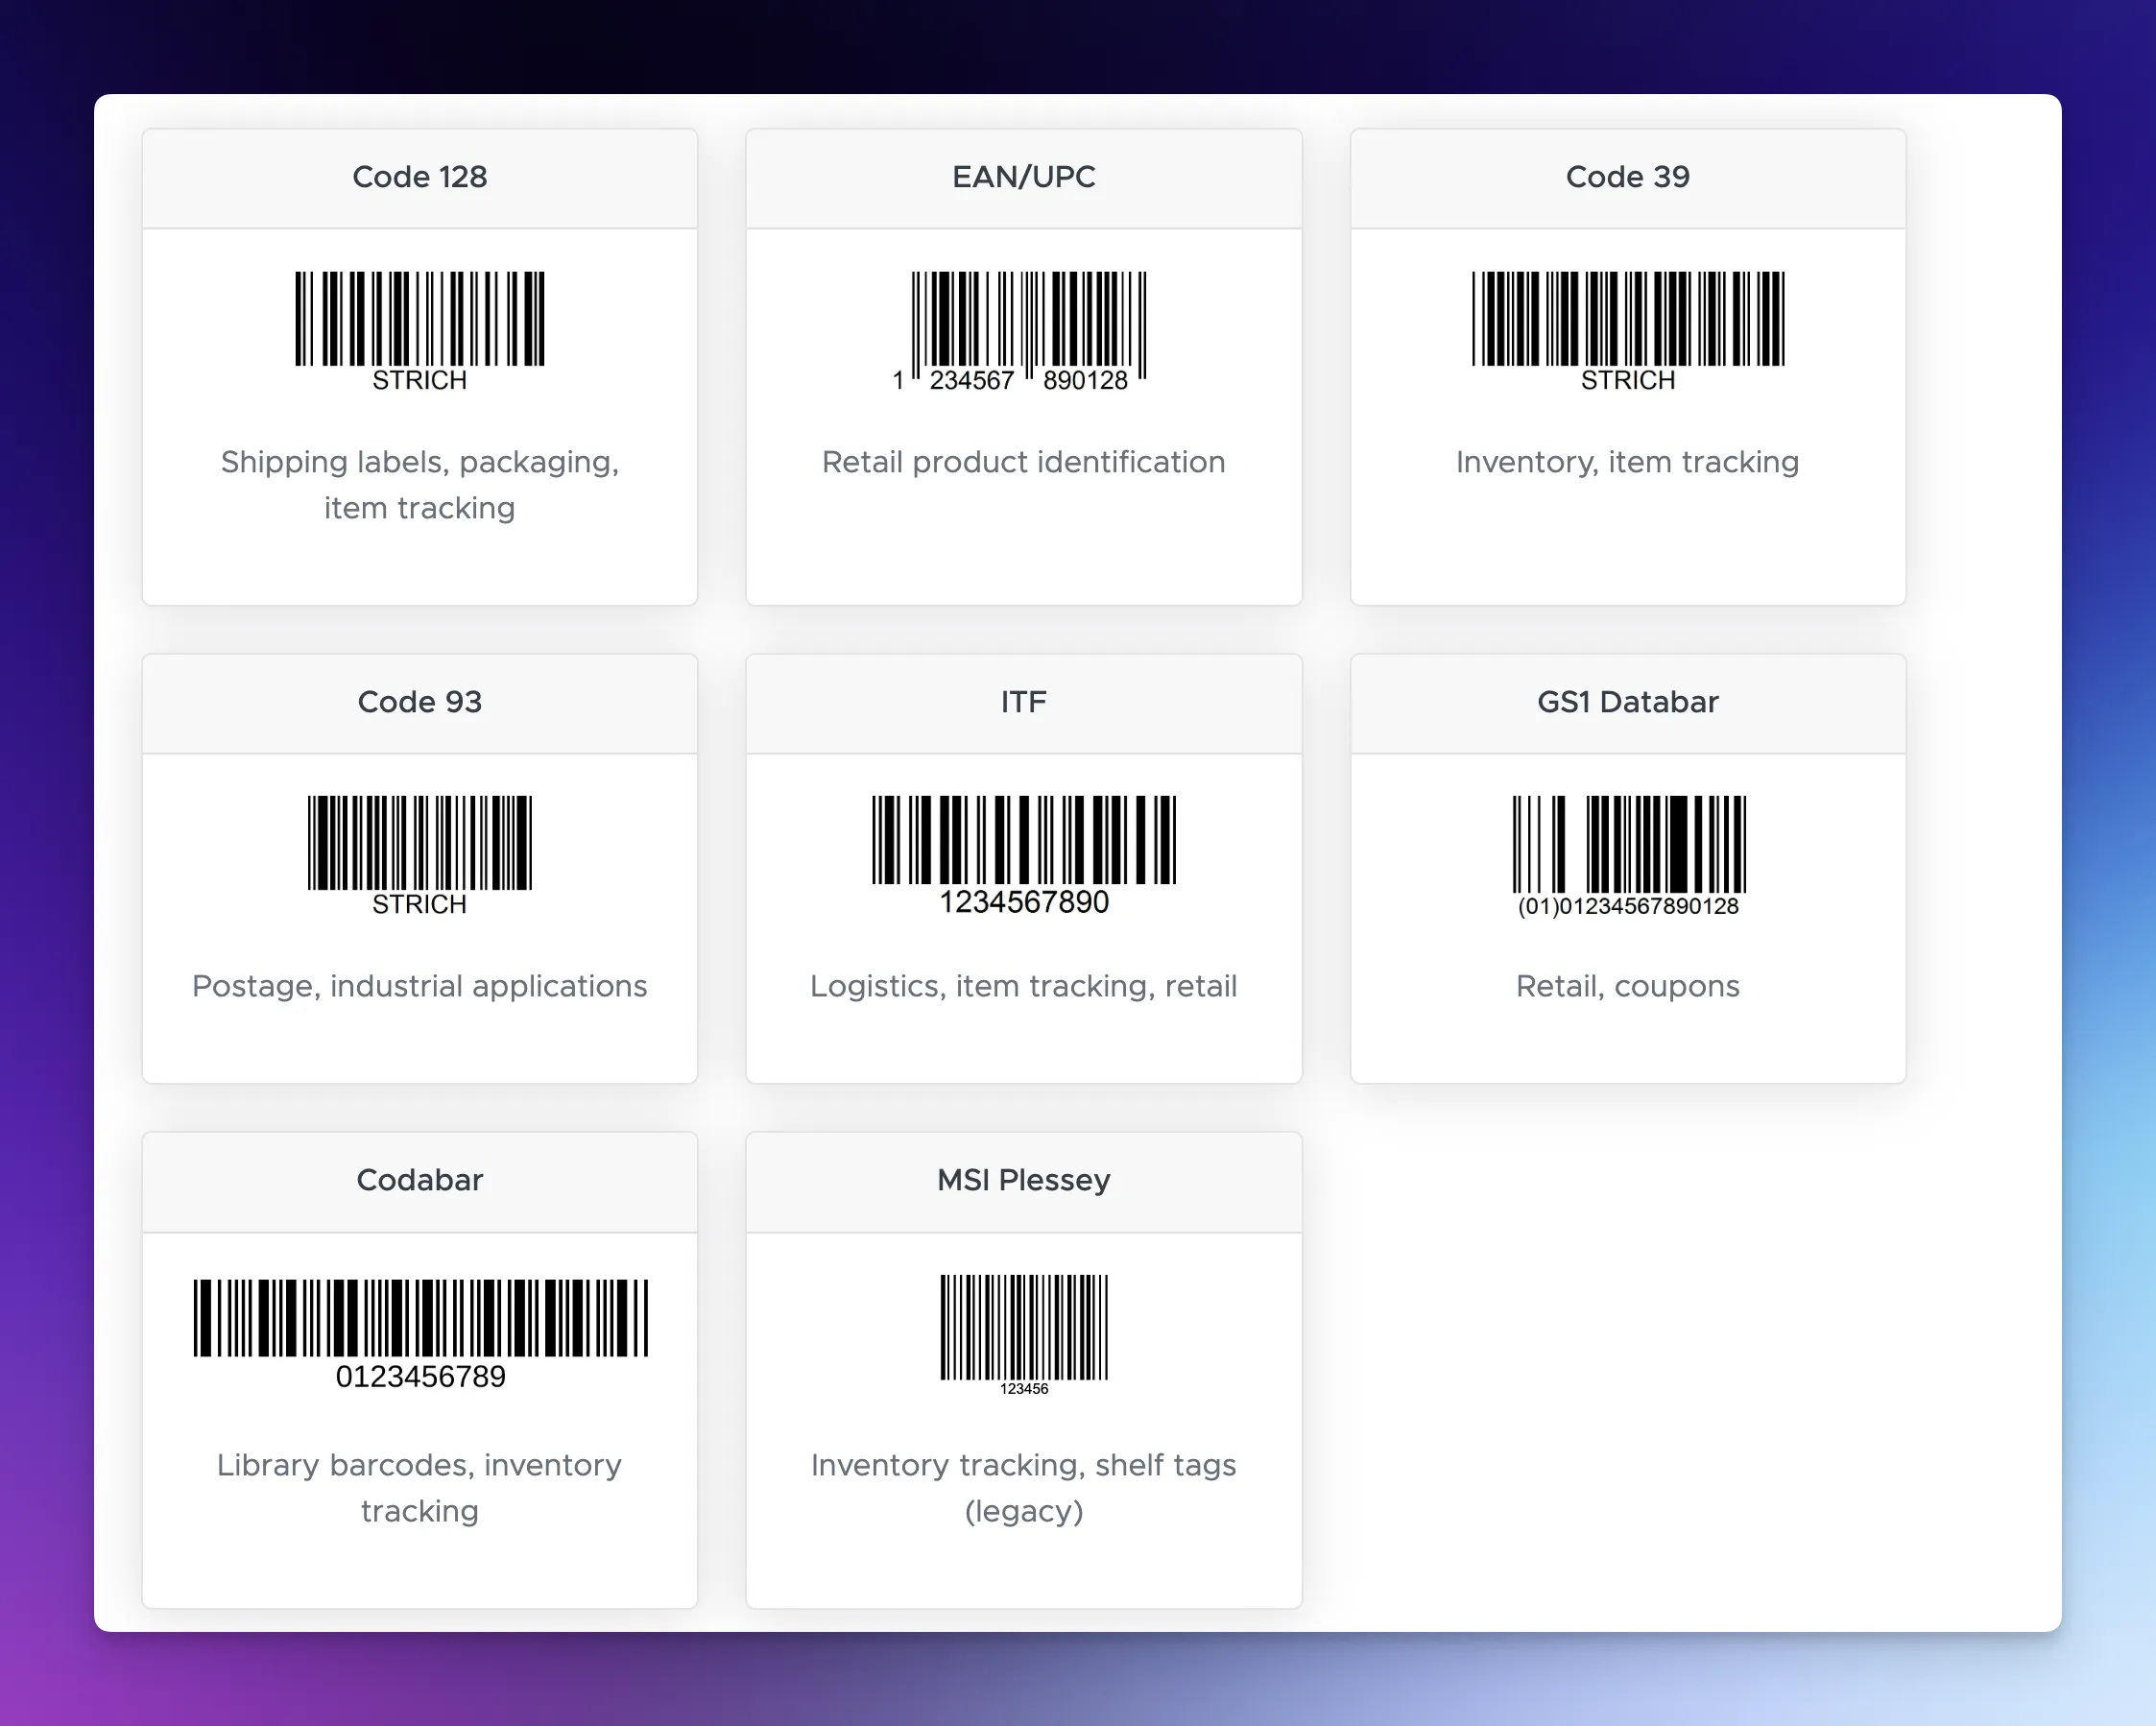
- Multiple Barcode Types: Supports Code 128, EAN, UPC, QR codes, and more
- Built-in UI Components: Camera controls, flashlight, and tap-to-focus included
The main benefit? You can turn any device with a camera into a professional barcode scanner by simply visiting your web app.
Prerequisites
Before we begin building, make sure you have:
Required Knowledge:
- Basic understanding of React (components, hooks, state)
- Familiarity with TypeScript (optional but recommended)
- Basic JavaScript/ES6 knowledge
Development Environment:
- Node.js
- A code editor (VS Code recommended)
- A device with a camera for testing
What We’ll Use:
- React 19+: For building the user interface
- TypeScript: For type safety and better developer experience
- Vite: Fast development build tool
- STRICH SDK: For barcode scanning functionality
- TailwindCSS: For quick and clean styling
Note: You can also read our previous guide on scanning barcodes in ReactJS, which covers installing the STRICH SDK.
Don’t worry if you’re new to some of these tools. We’ll walk through each step carefully.
Let’s get started.
Step 1: Set Up Your React Project
Let’s start by creating a new React project with Vite. Vite is incredibly fast and perfect for modern React development.
Create the Project
Open your terminal and run:
npm create vite@latest inventory-scannerYou can also use the dot (.) to indicate that you already have an empty folder and that you want to install Vite there.
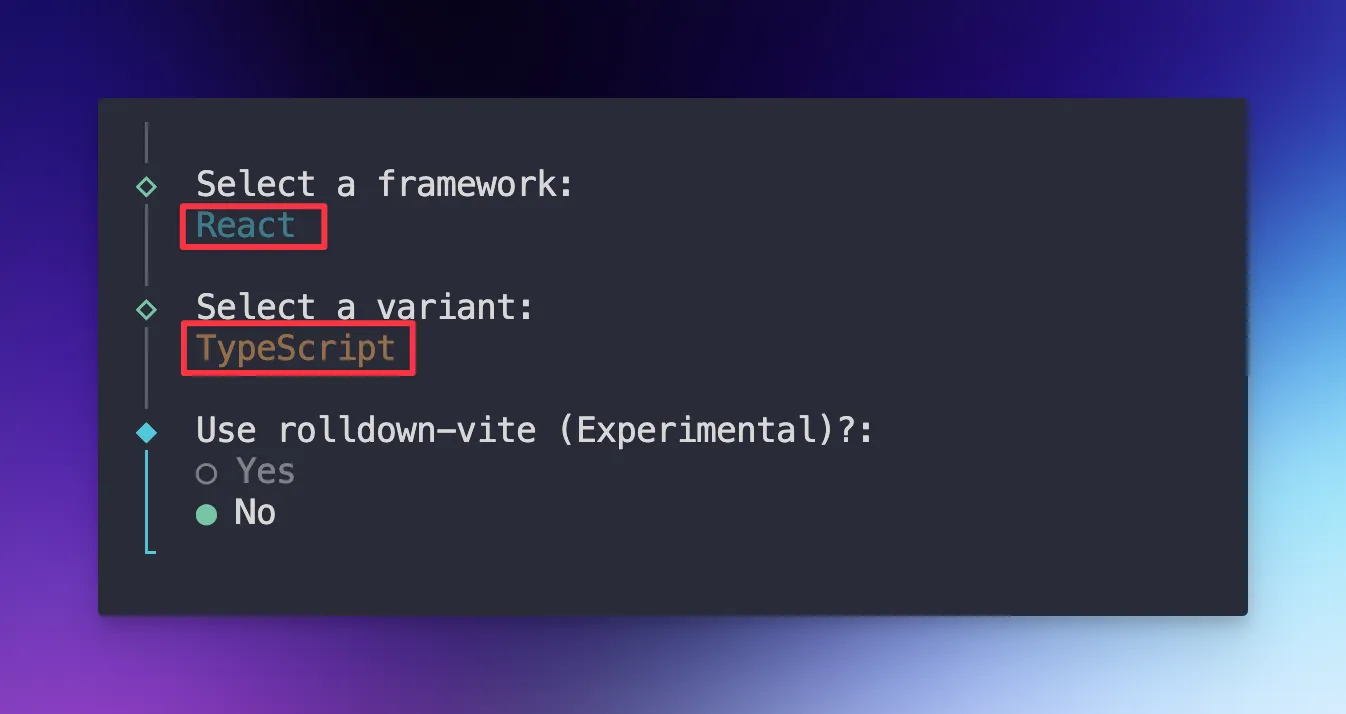
When prompted:
- Select React as the framework
- Choose TypeScript as the variant
Navigate into your project:
cd inventory-scannerInstall Dependencies
Install the required package:
npm i @pixelverse/strichjs-sdkFor styling, you can follow TailwindCSS Vite guide. It is easy to setup.
Your development environment is now ready!
Step 2: Get Your STRICH License Key

STRICH requires a license key to function. Don’t worry, there’s a free 30-day trial perfect for development and testing.
Obtain Your License Key
- Visit the STRICH Portal
- Create a free account
- Navigate to the License Keys from Navbar
- Put the URL and Click “Create License Key”
- Copy your license key
Store the License Key Securely
Create a .env file in your project root with the following contents:
VITE_STRICH_LICENSE_KEY=your_license_key_hereImportant: Add .env to your .gitignore file to keep your license key private.
Note: Vite requires environment variables to be prefixed with VITE_ to be accessible in your application.
Step 3: Initialize STRICH SDK
Now let’s create a custom React hook to initialize the STRICH SDK. This hook will manage the SDK lifecycle and provide initialization status.
Create the Hook
Create a new folder src/hooks/ and inside it, create useStrichSDK.ts:
import { SdkError, StrichSDK } from "@pixelverse/strichjs-sdk";
import { useEffect, useState } from "react";

const useStrichSDK = (licenseKey: string) => {
  const [isStrichInit, setIsStrichInit] = useState(false);
  const [strichInitError, setStrichInitError] = useState<SdkError | null>(null);

  useEffect(() => {
    StrichSDK.initialize(licenseKey)
      .then(() => {
        setIsStrichInit(true);
      })
      .catch((error: SdkError) => {
        setStrichInitError(error);
      });
  }, [licenseKey]);

  return { isStrichInit, strichInitError };
};

export default useStrichSDK;
Let’s break down what each part does:
StrichSDK- The main SDK class for initializationuseEffect- React hook for side effectsuseState- React hook for managing stateisStrichInit- Tracks whether the SDK has successfully initialized. Starts asfalse.strichInitError- Stores any error that occurs during initialization.
The useEffect runs once when the component mounts:
- Calls
StrichSDK.initialize()with your license key - If successful, sets
isStrichInittotrue - If it fails, captures the error in
strichInitError - The dependency array
[licenseKey]means it re-runs if the license key changes
This hook returns both the initialization status and any error, making them available to components that use this hook.
Step 4: Define TypeScript Types
Strong typing helps prevent bugs and improves code quality. Let’s define the types for our inventory items.
Create Types File
Create src/types/inventory.ts:
export interface InventoryItem {
  barcode: string;
  productName: string;
  quantity: number;
  lastScanned: Date;
  category?: string;
}

export interface ScanResult {
  data: string;
  format: string;
  timestamp: Date;
}
InventoryItem Interface:
barcode- The unique identifier scanned from the product. This is our primary key.productName- Human-readable name of the product (e.g., “Pasta”).quantity- Current stock quantity. Increments each time the same barcode is scanned.lastScanned- Timestamp of the most recent scan. Useful for tracking activity.category- Optional category for organizing products (e.g., “Beverages”, “Electronics”).
ScanResult Interface: This represents the raw data returned from the barcode scanner:
data- The barcode valueformat- Barcode type (EAN-13, Code 128, etc.)timestamp- When the scan occurred
These types will help TypeScript catch errors and provide better autocomplete suggestions.
Step 5: Build the Inventory Scanner Component
Now comes the exciting part. Building the actual scanner component that ties everything together.
Create the Component
Create src/components/InventoryScanner.tsx:
import { BarcodeReader } from "@pixelverse/strichjs-sdk";
import { useEffect, useRef, useState } from "react";
import useStrichSDK from "../hooks/useStrichSDK";
import { type InventoryItem } from "../types/inventory";

const InventoryScanner = () => {
  const { isStrichInit, strichInitError } = useStrichSDK(
    import.meta.env.VITE_STRICH_LICENSE_KEY
  );

  const [inventory, setInventory] = useState<InventoryItem[]>([]);
  const readerRef = useRef<BarcodeReader | null>(null);
  const scannerContainerRef = useRef<HTMLDivElement>(null);
  const [isScanning, setIsScanning] = useState(false);

  // We'll add more code here in the next steps

  return (
    <div className="min-h-screen bg-gray-50 p-4">
      <div className="max-w-6xl mx-auto">
        <h1 className="text-3xl font-bold mb-6 text-gray-800">
          Inventory Barcode Scanner
        </h1>
        {/* Scanner and inventory display will go here */}
      </div>
    </div>
  );
};

export default InventoryScanner;
Initialize the Scanner
Add this useEffect hook to initialize the barcode reader (InventoryScanner):
useEffect(() => {
  if (!isStrichInit || !scannerContainerRef.current) return;

  const reader = new BarcodeReader({
    selector: scannerContainerRef.current,
    engine: {
     symbologies: ["code128", "ean13", "ean8", "upca", "upce"],
    },
 });

  reader.initialize().then((instance) => {
    readerRef.current = instance;

    instance.detected = (detections) => {
      const detection = detections[0];
      if (detection?.data) {
        handleBarcodeDetected(detection.data);
      }
    };
  });

  return () => {
    readerRef.current?.destroy();
    readerRef.current = null;
  };
}, [isStrichInit]);- The STRICH SDK is ready (
isStrichInit) - The DOM element for the scanner exists (
scannerContainerRef.current) selector- The DOM element where the camera view appearssymbologies- Barcode types to detect. This speeds up scanning by limiting what the SDK looks for
Common barcode types:
code128- Widely used for inventory and shippingean13/ean8- European retail productsupca/upce- North American retail products
When a barcode is detected:
- Get the first detection from the array
- Extract the barcode data
- Call our handler function (we’ll create this next)
At the end, clean up when the component unmounts to prevent memory leaks.
Step 6: Implement Barcode Detection Logic
Now let’s create the function that handles detected barcodes and manages inventory.
Add the Detection Handler
Add this function inside your InventoryScanner component:
const handleBarcodeDetected = (barcode: string) => {
  setInventory((prevInventory) => {
    // Check if item already exists
    const existingIndex = prevInventory.findIndex(
      (item) => item.barcode === barcode
    );

    if (existingIndex !== -1) {
      // Item exists - increment quantity
      const updated = [...prevInventory];
      updated[existingIndex] = {
        ...updated[existingIndex],
        quantity: updated[existingIndex].quantity + 1,
        lastScanned: new Date(),
      };
      return updated;
    } else {
      // New item - add to inventory
      const newItem: InventoryItem = {
        barcode,
        productName: `Product ${barcode}`,
        quantity: 1,
        lastScanned: new Date(),
      };
      return [newItem, ...prevInventory];
    }
  });
};
This function is the heart of our inventory system. Let’s break it down step by step.
setInventory((prevInventory) => {
  // logic here
});
We use the functional form of setState because we need the previous state to make decisions. This ensures we always work with the most current data.
const existingIndex = prevInventory.findIndex(
  (item) => item.barcode === barcode
);
Search the inventory for an item with the same barcode:
- Returns the index if found
- Returns
1if not found
Updating Existing Items:
if (existingIndex !== -1) {
  const updated = [...prevInventory];
  updated[existingIndex] = {
    ...updated[existingIndex],
    quantity: updated[existingIndex].quantity + 1,
    lastScanned: new Date(),
  };
  return updated;
}
When an item already exists:
- Create a copy of the inventory array
- Update the specific item:
- Increment the quantity by 1
- Update the
lastScannedtimestamp
- Return the updated array
else {
  const newItem: InventoryItem = {
    barcode,
    productName: `Product ${barcode}`,
    quantity: 1,
    lastScanned: new Date(),
  };
  return [newItem, ...prevInventory];
}
When it’s a new item:
- Create a new
InventoryItemobject - Set quantity to 1 (first scan)
- Add it to the beginning of the array (newest items first)
Note: In a real application, you’d look up the product name from a database or API instead of using Product ${barcode}.
Step 7: Create Scanner Controls
Users need buttons to start and stop the scanner. Let’s add those controls.
Add Control Functions
Add these functions to your component:
const handleStart = async () => {
  if (readerRef.current && !isScanning) {
    try {
      await readerRef.current.start();
      setIsScanning(true);
    } catch (error) {
      console.error("Failed to start scanner:", error);
    }
  }
};

const handleStop = async () => {
  if (readerRef.current && isScanning) {
    try {
      await readerRef.current.stop();
      setIsScanning(false);
    } catch (error) {
      console.error("Failed to stop scanner:", error);
    }
  }
};

const clearInventory = () => {
  if (window.confirm("Clear all inventory items?")) {
    setInventory([]);
  }
};
These controls give users full control over the scanning process.
handleStart:
- Check that the reader exists and isn’t already scanning
- Call
start()to activate the camera - Update state to reflect scanning status
- Handle any errors (e.g., camera permission denied)
handleStop is similar to start, but:
- Only runs if currently scanning
- Stops the camera feed
- Updates state accordingly
clearInventory:
- Shows a confirmation dialog to prevent accidental data loss
- Resets the inventory to an empty array if confirmed
Step 8: Build the User Interface
Now let’s create the complete UI that brings everything together.
Add Loading and Error States
if (strichInitError) {
  return (
    <div className="min-h-screen flex items-center justify-center bg-red-50">
      <div className="text-center p-6 bg-white rounded-lg shadow-lg">
        <h2 className="text-2xl font-bold text-red-600 mb-2">
          Scanner Error
        </h2>
        <p className="text-gray-700">{strichInitError.message}</p>
        <p className="text-sm text-gray-500 mt-4">
          Please check your license key
        </p>
      </div>
    </div>
  );
}

if (!isStrichInit) {
  return (
    <div className="min-h-screen flex items-center justify-center bg-gray-50">
      <div className="text-center">
        <div className="animate-spin rounded-full h-12 w-12 border-b-2 border-blue-600 mx-auto mb-4"></div>
        <p className="text-gray-600">Initializing scanner...</p>
      </div>
    </div>
  );
}
Create the Main Layout
Update your return statement with the complete UI:
 return (
 <div className="min-h-screen bg-gray-50 p-4 max-w-6xl mx-auto">
      <div className="">
        <h1 className="font-bold mb-6 text-gray-800 text-2xl md:text-3xl text-center">
          Inventory Barcode Scanner
        </h1>

        <div className="grid md:grid-cols-2 gap-6">
          <div className="bg-white rounded-lg shadow-md p-6">
            <h2 className="text-xl font-semibold mb-4 text-gray-500">
              Scanner
            </h2>

            <div
              ref={scannerContainerRef}
              className="relative w-full aspect-video bg-black rounded-lg mb-4 overflow-hidden"
            ></div>

            <div className="flex gap-3">
              <button
                onClick={handleStart}
                disabled={isScanning}
                className="flex-1 px-4 py-2 bg-green-600 text-white rounded-lg font-medium hover:bg-green-700 disabled:bg-gray-300 disabled:cursor-not-allowed transition-colors"
              >
                {isScanning ? "Scanning..." : "Start Scanner"}
              </button>

              <button
                onClick={handleStop}
                disabled={!isScanning}
                className="flex-1 px-4 py-2 bg-red-600 text-white rounded-lg font-medium hover:bg-red-700 disabled:bg-gray-300 disabled:cursor-not-allowed transition-colors"
              >
                Stop Scanner
              </button>
            </div>
          </div>

          <div className="bg-white rounded-lg shadow-md p-6">
            <div className="flex justify-between items-center mb-4">
              <h2 className="text-xl font-semibold text-gray-700">
                Inventory ({inventory.length} items)
              </h2>
              <button
                onClick={clearInventory}
                className="px-4 py-2 bg-blue-600 text-white rounded-lg font-medium hover:bg-blue-700 transition-colors text-sm"
              >
                Clear All
              </button>
            </div>

            <div className="space-y-3 max-h-96 overflow-y-auto">
              {inventory.length === 0 ? (
                <p className="text-gray-500 text-center py-8">
                  No items scanned yet. Start scanning to add products!
                </p>
              ) : (
                inventory.map((item) => (
                  <div
                    key={item.barcode}
                    className="border border-gray-200 rounded-lg p-4 hover:shadow-md transition-shadow"
                  >
                    <div className="flex justify-between items-start mb-2">
                      <div className="flex-1">
                        <h3 className="font-semibold text-gray-800">
                          {item.productName}
                        </h3>
                        <p className="text-sm text-gray-500">
                          Barcode: {item.barcode}
                        </p>
                      </div>
                      <span className="bg-blue-100 text-blue-800 px-3 py-1 rounded-full font-semibold text-sm">
                        Qty: {item.quantity}
                      </span>
                    </div>
                    <p className="text-xs text-gray-400">
                      Last scanned: {item.lastScanned.toLocaleString()}
                    </p>
                  </div>
                ))
              )}
            </div>
          </div>
        </div>
      </div>
    </div>


  );
Step 9: Put It All Together
Now let’s assemble the complete component and wire it up to your app.
Complete InventoryScanner Component
import { BarcodeReader } from "@pixelverse/strichjs-sdk";
import { useEffect, useRef, useState } from "react";
import useStrichSDK from "../hooks/useStrichSDK";
import { type InventoryItem } from "../types/inventory";

const InventoryScanner = () => {
  const { isStrichInit, strichInitError } = useStrichSDK(
    import.meta.env.VITE_STRICH_LICENSE_KEY
  );

  const [inventory, setInventory] = useState<InventoryItem[]>([]);
  const readerRef = useRef<BarcodeReader | null>(null);
  const scannerContainerRef = useRef<HTMLDivElement>(null);
  const [isScanning, setIsScanning] = useState(false);


  const handleBarcodeDetected = (barcode: string) => {
    setInventory((prevInventory) => {
      const existingIndex = prevInventory.findIndex(
        (item) => item.barcode === barcode
      );

      if (existingIndex !== -1) {
        const updated = [...prevInventory];
        updated[existingIndex] = {
          ...updated[existingIndex],
          quantity: updated[existingIndex].quantity + 1,
          lastScanned: new Date(),
        };
        return updated;
      } else {
        const newItem: InventoryItem = {
          barcode,
          productName: `Product ${barcode}`,
          quantity: 1,
          lastScanned: new Date(),
        };
        return [newItem, ...prevInventory];
      }
    });
  };

  const handleStart = async () => {
    if (readerRef.current && !isScanning) {
      try {
        await readerRef.current.start();
        setIsScanning(true);
      } catch (error) {
        console.error("Failed to start scanner:", error);
      }
    }
  };

  const handleStop = async () => {
    if (readerRef.current && isScanning) {
      try {
        await readerRef.current.stop();
        setIsScanning(false);
      } catch (error) {
        console.error("Failed to stop scanner:", error);
      }
    }
  };

  const clearInventory = () => {
    if (window.confirm("Clear all inventory items?")) {
      setInventory([]);
    }
  };

   useEffect(() => {
    if (!isStrichInit || !scannerContainerRef.current) return;

    const reader = new BarcodeReader({
      selector: scannerContainerRef.current,
      engine: {
        symbologies: ["code128", "ean13", "ean8", "upca", "upce"],
      },
    });

    reader.initialize().then((instance) => {
      readerRef.current = instance;

      instance.detected = (detections) => {
        const detection = detections[0];
        if (detection?.data) {
          handleBarcodeDetected(detection.data);
        }
      };
    });

    return () => {
      readerRef.current?.destroy();
      readerRef.current = null;
    };
  }, [isStrichInit]);

  if (strichInitError) {
    return (
      <div className="min-h-screen flex items-center justify-center bg-red-50">
        <div className="text-center p-6 bg-white rounded-lg shadow-lg">
          <h2 className="text-2xl font-bold text-red-600 mb-2">
            Scanner Error
          </h2>
          <p className="text-gray-700">{strichInitError.message}</p>
          <p className="text-sm text-gray-500 mt-4">
            Please check your license key
          </p>
        </div>
      </div>
    );
  }

  if (!isStrichInit) {
    return (
      <div className="min-h-screen flex items-center justify-center bg-gray-50">
        <div className="text-center">
          <div className="animate-spin rounded-full h-12 w-12 border-b-2 border-blue-600 mx-auto mb-4"></div>
          <p className="text-gray-600">Initializing scanner...</p>
        </div>
      </div>
    );
  }

  return (

 <div className="min-h-screen bg-gray-50 p-4 max-w-6xl mx-auto">
      <div className="">
        <h1 className="font-bold mb-6 text-gray-800 text-2xl md:text-3xl text-center">
          Inventory Barcode Scanner
        </h1>

        <div className="grid md:grid-cols-2 gap-6">
          <div className="bg-white rounded-lg shadow-md p-6">
            <h2 className="text-xl font-semibold mb-4 text-gray-500">
              Scanner
            </h2>

            <div
              ref={scannerContainerRef}
              className="relative w-full aspect-video bg-black rounded-lg mb-4 overflow-hidden"
            ></div>

            <div className="flex gap-3">
              <button
                onClick={handleStart}
                disabled={isScanning}
                className="flex-1 px-4 py-2 bg-green-600 text-white rounded-lg font-medium hover:bg-green-700 disabled:bg-gray-300 disabled:cursor-not-allowed transition-colors"
              >
                {isScanning ? "Scanning..." : "Start Scanner"}
              </button>

              <button
                onClick={handleStop}
                disabled={!isScanning}
                className="flex-1 px-4 py-2 bg-red-600 text-white rounded-lg font-medium hover:bg-red-700 disabled:bg-gray-300 disabled:cursor-not-allowed transition-colors"
              >
                Stop Scanner
              </button>
            </div>
          </div>

          <div className="bg-white rounded-lg shadow-md p-6">
            <div className="flex justify-between items-center mb-4">
              <h2 className="text-xl font-semibold text-gray-700">
                Inventory ({inventory.length} items)
              </h2>
              <button
                onClick={clearInventory}
                className="px-4 py-2 bg-blue-600 text-white rounded-lg font-medium hover:bg-blue-700 transition-colors text-sm"
              >
                Clear All
              </button>
            </div>

            <div className="space-y-3 max-h-96 overflow-y-auto">
              {inventory.length === 0 ? (
                <p className="text-gray-500 text-center py-8">
                  No items scanned yet. Start scanning to add products!
                </p>
              ) : (
                inventory.map((item) => (
                  <div
                    key={item.barcode}
                    className="border border-gray-200 rounded-lg p-4 hover:shadow-md transition-shadow"
                  >
                    <div className="flex justify-between items-start mb-2">
                      <div className="flex-1">
                        <h3 className="font-semibold text-gray-800">
                          {item.productName}
                        </h3>
                        <p className="text-sm text-gray-500">
                          Barcode: {item.barcode}
                        </p>
                      </div>
                      <span className="bg-blue-100 text-blue-800 px-3 py-1 rounded-full font-semibold text-sm">
                        Qty: {item.quantity}
                      </span>
                    </div>
                    <p className="text-xs text-gray-400">
                      Last scanned: {item.lastScanned.toLocaleString()}
                    </p>
                  </div>
                ))
              )}
            </div>
          </div>
        </div>
      </div>
    </div>


  );
};

export default InventoryScanner;
How It All Works: The Complete Flow
Let’s visualize how everything comes together when a user scans a barcode.
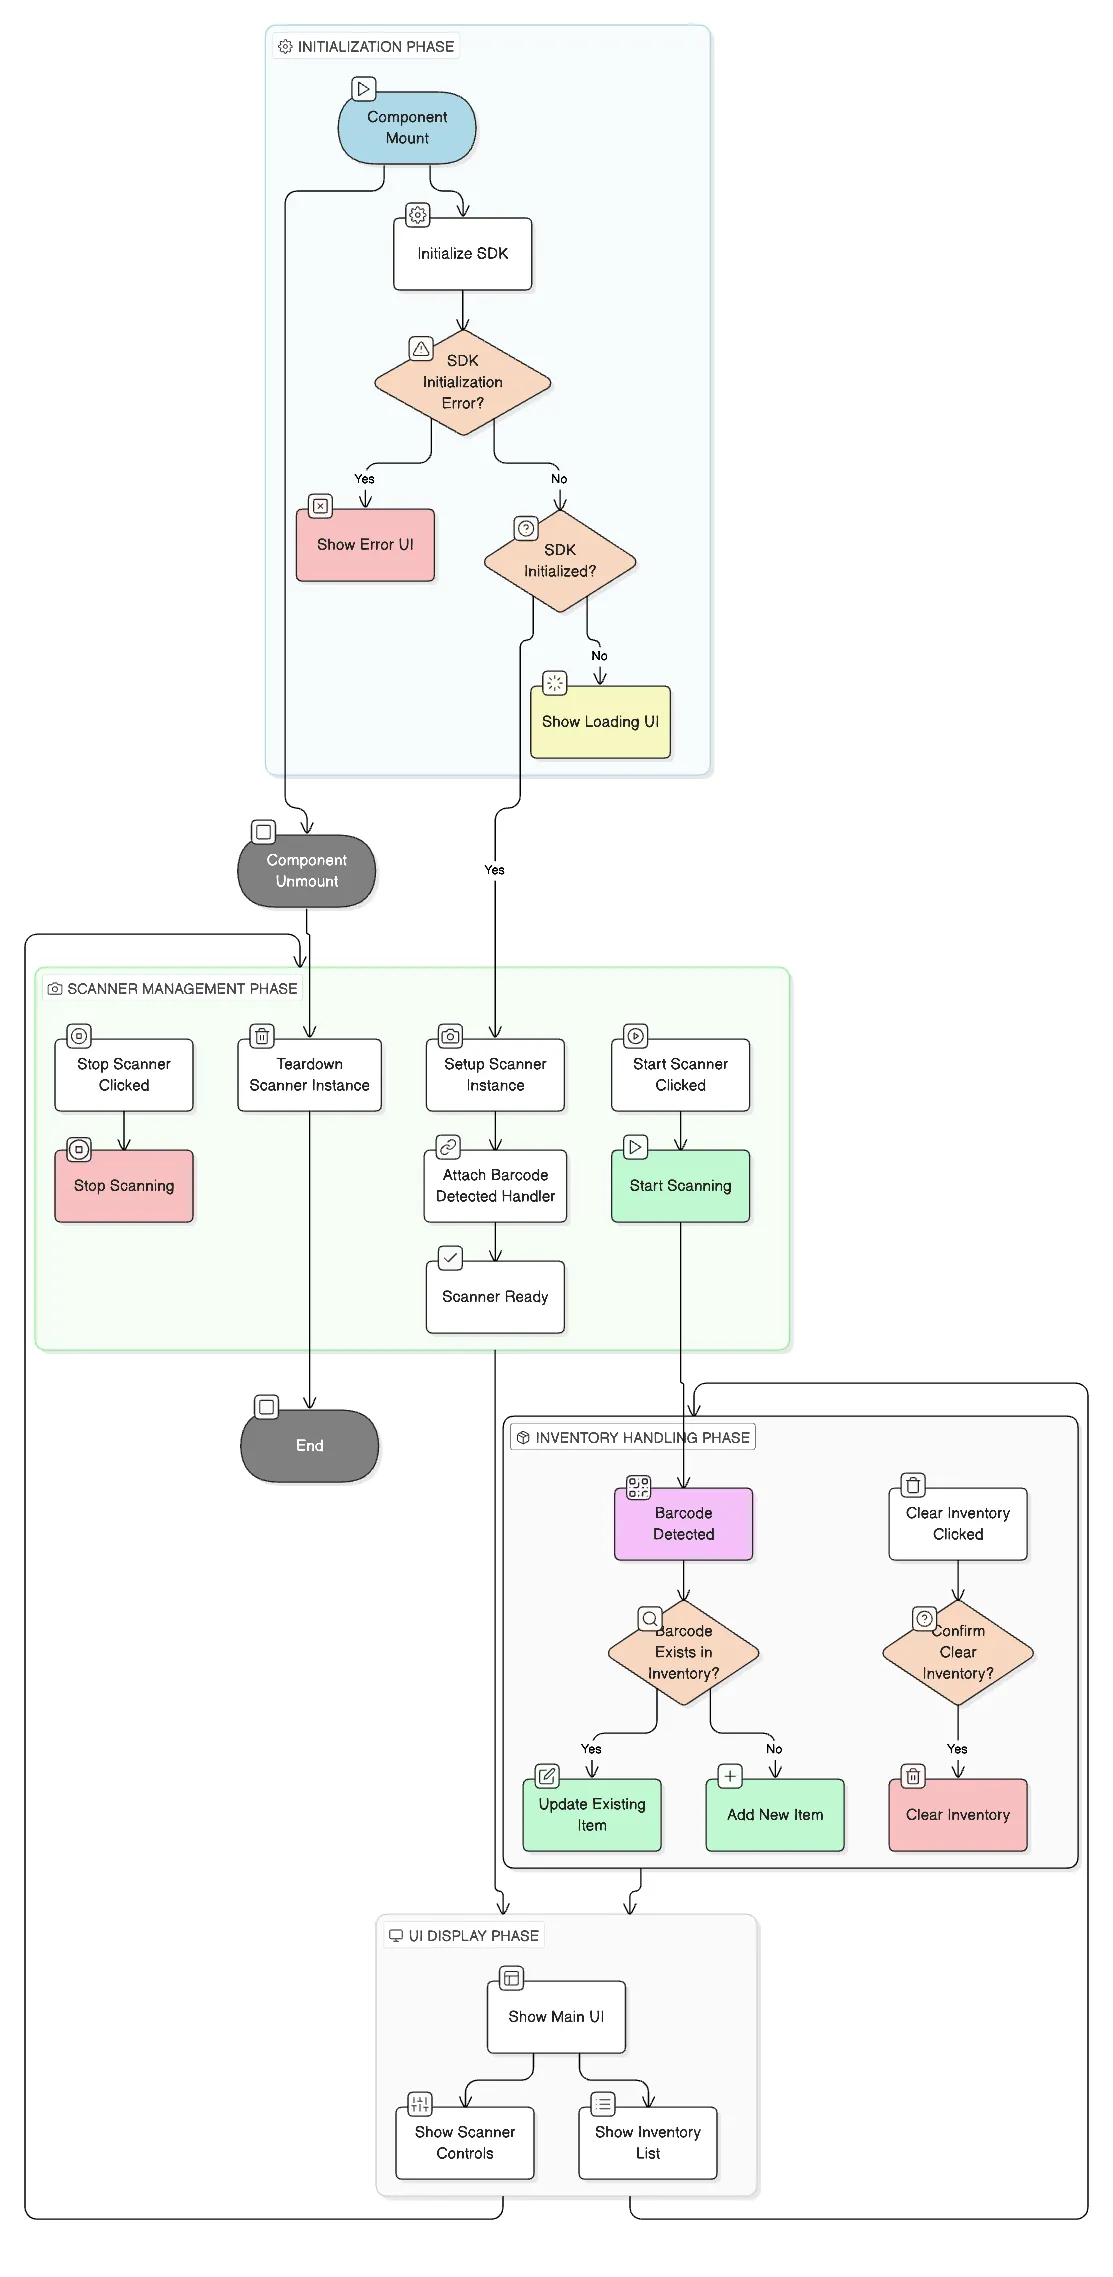
Phase 1: Initialization
- User opens the app
- STRICH SDK initializes with license key
- BarcodeReader instance created
- Camera interface prepared (but not started)
Phase 2: Starting the Scanner
- User clicks “Start Scanner”
handleStart()function called- Camera permission requested
- Camera feed starts displaying
- Scanner begins analyzing frames
Phase 3: Barcode Detection
- Camera captures video frames
- STRICH analyzes each frame
- When barcode detected:
detectedcallback fires- Barcode data extracted
handleBarcodeDetected()called
Phase 4: Inventory Update
- System checks if barcode exists
- If exists: Increment quantity, update timestamp
- If new: Create new inventory item with quantity 1
- React re-renders inventory list
Phase 5: Visual Feedback
- New/updated item appears in list
- Quantity badge shows current count
- Timestamp shows when last scanned
- User can continue scanning
Final Words
You’ve built a fully functional inventory barcode scanner using ReactJS and STRICH. Let’s recap what you’ve accomplished.
- How to integrate STRICH SDK into a React application
- Camera-based barcode scanning in web browsers
- Managing complex state with React hooks
- Building responsive, production-ready UI
- Implementing smart duplicate detection
FAQs
Why isn’t the scanner loading?
This usually happens due to one of the following reasons:
- The license key is incorrect or has expired
- The website is not running on HTTPS (camera access requires HTTPS)
- There are JavaScript errors during initialization (check the browser console)
- The
useStrichSDKhook is missing or not implemented correctly
Why am I seeing a Camera access denied error?
This occurs when the browser cannot access the camera. Common causes include:
- The user is visiting the site for the first time and hasn’t granted permission yet
- Camera permissions were previously denied in the browser settings
- The site is running on HTTP instead of HTTPS
- The camera is currently being used by another application