Published on: Tue Dec 09 2025 by Shan Asif
Most developers assume barcode scanning requires a native mobile app or a third-party scanning device, but that isn’t true anymore. Modern browsers, when paired with the right SDK, can access your device’s camera and decode barcodes in real time.
No plugins, no native wrappers, no ecosystem lock-in.
And yet, if you’ve tried adding scanning to Vue before, you’ve hit the usual wall: outdated libraries, complex setups, permission issues, or solutions that only work on certain devices.
So in this step-by-step tutorial, we’ll break that pattern. You’ll learn how to turn any Vue 3 app into a fully functional, browser-based barcode scanner using the STRICH SDK.
Demo Video:
Let’s get started.
Before we start building, here’s a quick look at what we’ll use and why. If you’re already working with a different setup, don’t worry. Everything here works the same across modern build tools and Vue environments.
- Vite (Build Tool): If you’re using Vue CLI, Parcel, or any other bundler, you can still follow along. Build tools simply help bundle, optimize, and serve your code. They don’t affect how the barcode scanner works.
- STRICH SDK (Barcode Scanner): JavaScript library for real-time barcode scanning directly in the web browser.
- Tailwind CSS (Optional UI Styling): We’ll use it to style simple UI elements like Start, Stop, and Clear Result buttons. You can replace it with your own CSS, a component library, or completely custom styling. It won’t affect the functionality.
If you want to implement it in ReactJS, then you can follow our guide about barcode scanning in ReactJS.
Basic Setup
If you already have a Vue project, you can skip this part. Otherwise, create a new one.
Create a project directory with any name. I’m using “barcode-scanner” as my project name.
You can follow the Vite Guide for installation and prerequisites.
In our case, the following command is enough:
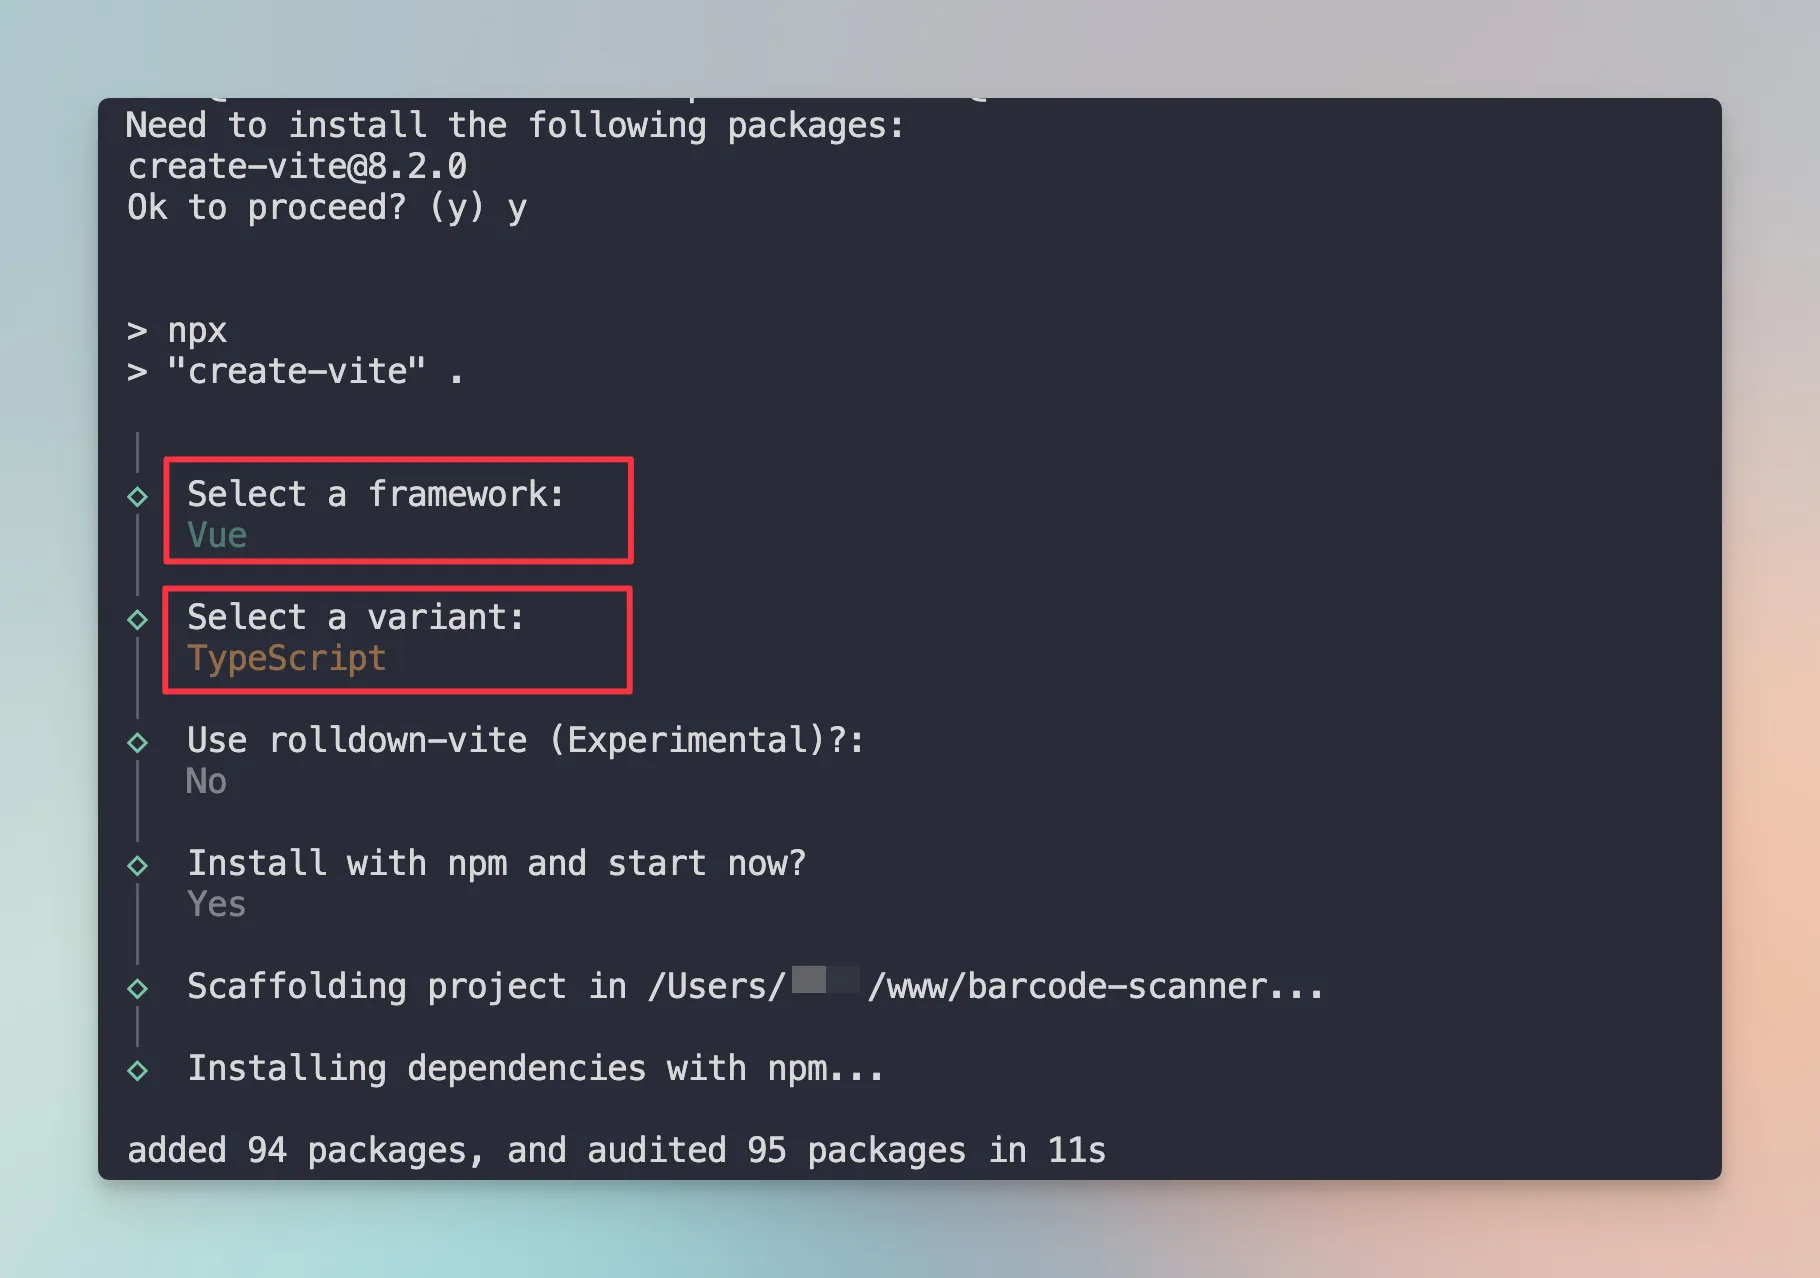
npm create vite@latest .Note: I added a period (.) at the end to let Vite set up our application in the current directory.
Now, you will be asked to choose the framework and the variant.
Just select Vue and Typescript.
Next, you can follow Tailwind CSS with Vite (a very quick and easy guide).
STRICH SDK Overview and Installation
STRICH is a lightweight, client-side JavaScript SDK that lets you add real-time barcode scanning to any web application.
With just a few lines of code, your app can tap into the user’s device camera and instantly recognize a wide range of barcodes. That includes common 1D barcodes found on product packaging and powerful 2D codes like QR codes.
Why STRICH?
Traditional barcode scanning required either:
- Native mobile apps that users must download
- Expensive dedicated scanner hardware
STRICH eliminates both requirements by bringing scanning directly to the browser. It is particularly valuable for businesses looking to simplify operations without forcing customers or employees to install apps or purchase equipment.
Try it yourself: Open STRICH’s demo on your phone and scan any barcode to see it in action.
To get started, install STRICH as an NPM package:
npm i @pixelverse/strichjs-sdkGet your License Key
After installation, the first thing you’ll do is initialize STRICH with your license key.
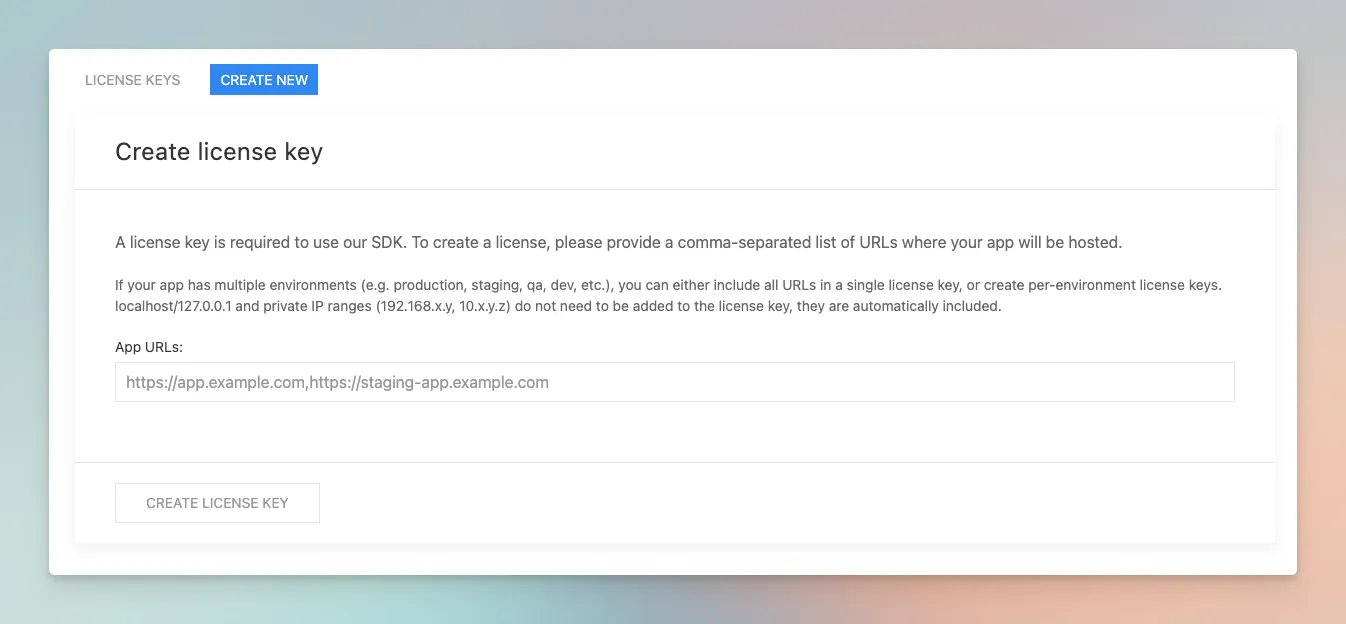
- You can find your key in the dashboard.
- Create a new license key and copy it.
- Now, create a .env file at the root of your Vue project and store your key inside a variable named VITE_STRICH_LICENSE_KEY.
Note: VITE_ prefix is required for Vite to expose the variable to your application.
VITE_STRICH_LICENSE_KEY="eyJhbGciOiJIUzI1.....zR96Bc"
SDK Composable
Composables are reusable functions that let you organize and share logic in Vue. They work a lot like React hooks, but use Vue’s own reactive system under the hood.
Let’s create a composable to handle STRICH SDK initialization.
Create a composables folder in your src directory with a file named useStrichSDK.ts:
import { StrichSDK, SdkError } from "@pixelverse/strichjs-sdk";
import { ref } from "vue";

export function useStrichSDK(licenseKey: string) {
  const isStrichInit = ref(false);
  const strichInitError = ref<SdkError | Error | null>(null);

  const initializeSDK = async () => {
    try {
      await StrichSDK.initialize(licenseKey);
      isStrichInit.value = true;
    } catch (error) {
      if (error instanceof SdkError) {
        strichInitError.value = error;
        console.error("STRICH SDK initialization failed:", error);
      } else {
        strichInitError.value = new Error(
          "Unknown error occurred during SDK initialization"
        );
      }
    }
  };

  initializeSDK();

  return {
    isStrichInit,
    strichInitError,
  };
}
Here are the quick key steps of this composable:
- Accepts the license key as a parameter
- Creates reactive state variables:
- isStrichInit: Tracks whether the SDK is ready to use
- strichInitError: Stores any initialization errors
- Initializes the SDK when the component mounts:
- Calls StrichSDK.initialize() with your license key
- Sets isStrichInit to true on success
- Captures and stores any errors with proper typing
- Returns reactive references that components can use to track initialization status
Create and Understand the Barcode Scanner Component
I’ll walk through each section, so you understand exactly how it works.
Create a components folder in src with a file named BarcodeScanner.vue:
Imports and Setup
<script setup lang="ts">
import { BarcodeReader, type CodeDetection } from "@pixelverse/strichjs-sdk";
import { ref, onUnmounted, watch } from "vue";
import { useStrichSDK } from "../composables/useStrichSDK";BarcodeReader: The STRICH class that handles scanning (there’s also a PopupScanner option)- Built-in Vue functions for reactivity and lifecycle management
useStrichSDK: Our custom composable for SDK initialization
SDK Initialization
const { isStrichInit, strichInitError } = useStrichSDK(
  import.meta.env.VITE_STRICH_LICENSE_KEY
);- Call
useStrichSDKwith our license key - It gives us:
isStrichInit:Tells if SDK is readystrichInitError:Holds any error from SDK loading
State Management
const scannerContainerRef = ref<HTMLDivElement | null>(null);
const readerRef = ref<BarcodeReader | null>(null);
const detections = ref<CodeDetection[]>([]);
const isScanning = ref(false);scannerContainerRef: Template ref pointing to the DOM element where the camera view appearsreaderRef: Holds the BarcodeReader instancedetections: Array of all scanned barcodesisScanning: Tracks whether scanning is currently active
Watcher (auto-setup when ready)
watch([isStrichInit, scannerContainerRef], async (initialized) => {
  if (initialized && scannerContainerRef.value) {
    const reader = new BarcodeReader({
      selector: scannerContainerRef.value,
    });

    const instance = await reader.initialize();
    readerRef.value = instance;

    instance.detected = (newDetections) => {
      detections.value = [...detections.value, ...newDetections];
    };
  }
});
This watcher:
- Waits for:
- SDK to finish loading
- Scanner container to be available in the DOM
- When both are ready:
- Create a new
BarcodeReader - Initialize it.
- Save instance to
readerRef - Listen for detected barcodes and add them to
detections.
- Create a new
Start, Stop, and Clear Results of the Scanner
const handleStart = async () => {
  if (readerRef.value && !isScanning.value) {
    try {
      await readerRef.value.start();
      isScanning.value = true;
    } catch (error) {
      console.error("Failed to start scanner:", error);
    }
  }
};
If the reader exists and isn’t already scanning:
- Start scanning
- Mark
isScanning = true
const handleStop = async () => {
  if (readerRef.value && isScanning.value) {
    try {
      await readerRef.value.stop();
      isScanning.value = false;
    } catch (error) {
      console.error("Failed to stop scanner:", error);
    }
  }
};

const clearDetections = () => {
  detections.value = [];
};
If the reader exists and is currently scanning:
- Stop scanning
- Mark
isScanning = false - Empty the scanned barcode list
onUnmounted(() => {
  if (readerRef.value) {
    readerRef.value.destroy();
    readerRef.value = null;
  }
});
</script>
When the component is removed:
- Destroy the reader to free the camera
- Set the reader to
null - Closed the script tag and move to template (UI) part
Template (UI)
<template>
  <div class="max-w-xl text-center mx-auto py-4 px-4">
    <h2 class="text-2xl font-bold mb-5">Barcode Scanner</h2>

    <div v-if="strichInitError" class="text-red-600">
      Error initializing scanner: {{ strichInitError.message }}
    </div>

    <div v-else-if="!isStrichInit" class="text-gray-600">
      Initializing scanner...
    </div>

    <div v-else class="flex flex-col">
      <div
        ref="scannerContainerRef"
        id="scanner"
        class="relative min-h-40 border-2 border-gray-300 rounded"
      ></div>

      <div class="actions mt-4 flex gap-2 justify-center">
        <button
          @click="handleStart"
          :disabled="isScanning"
          class="px-4 py-2 bg-green-500 text-white rounded disabled:bg-gray-300 disabled:cursor-not-allowed"
        >
          {{ isScanning ? "Scanning..." : "Start Scanner" }}
        </button>

        <button
          @click="handleStop"
          :disabled="!isScanning"
          class="px-4 py-2 bg-red-500 text-white rounded disabled:bg-gray-300 disabled:cursor-not-allowed"
        >
          Stop Scanner
        </button>

        <button
          @click="clearDetections"
          class="px-4 py-2 bg-blue-500 text-white rounded"
        >
          Clear Results
        </button>
      </div>
    </div>

    <div class="results mt-6">
      <h3 v-if="detections.length > 0" class="text-xl font-semibold mb-3">
        Scanned Barcodes:
      </h3>
      <div
        v-for="(detection, index) in detections"
        :key="index"
        class="p-2 mb-2 bg-gray-100 rounded"
      >
        {{ detection.data }}
      </div>
    </div>
  </div>
</template>
Show:
- a loading message while the SDK loads
- error if initialization fails
- scanner box once everything is ready
- buttons for start, stop, and clear
- barcode results below
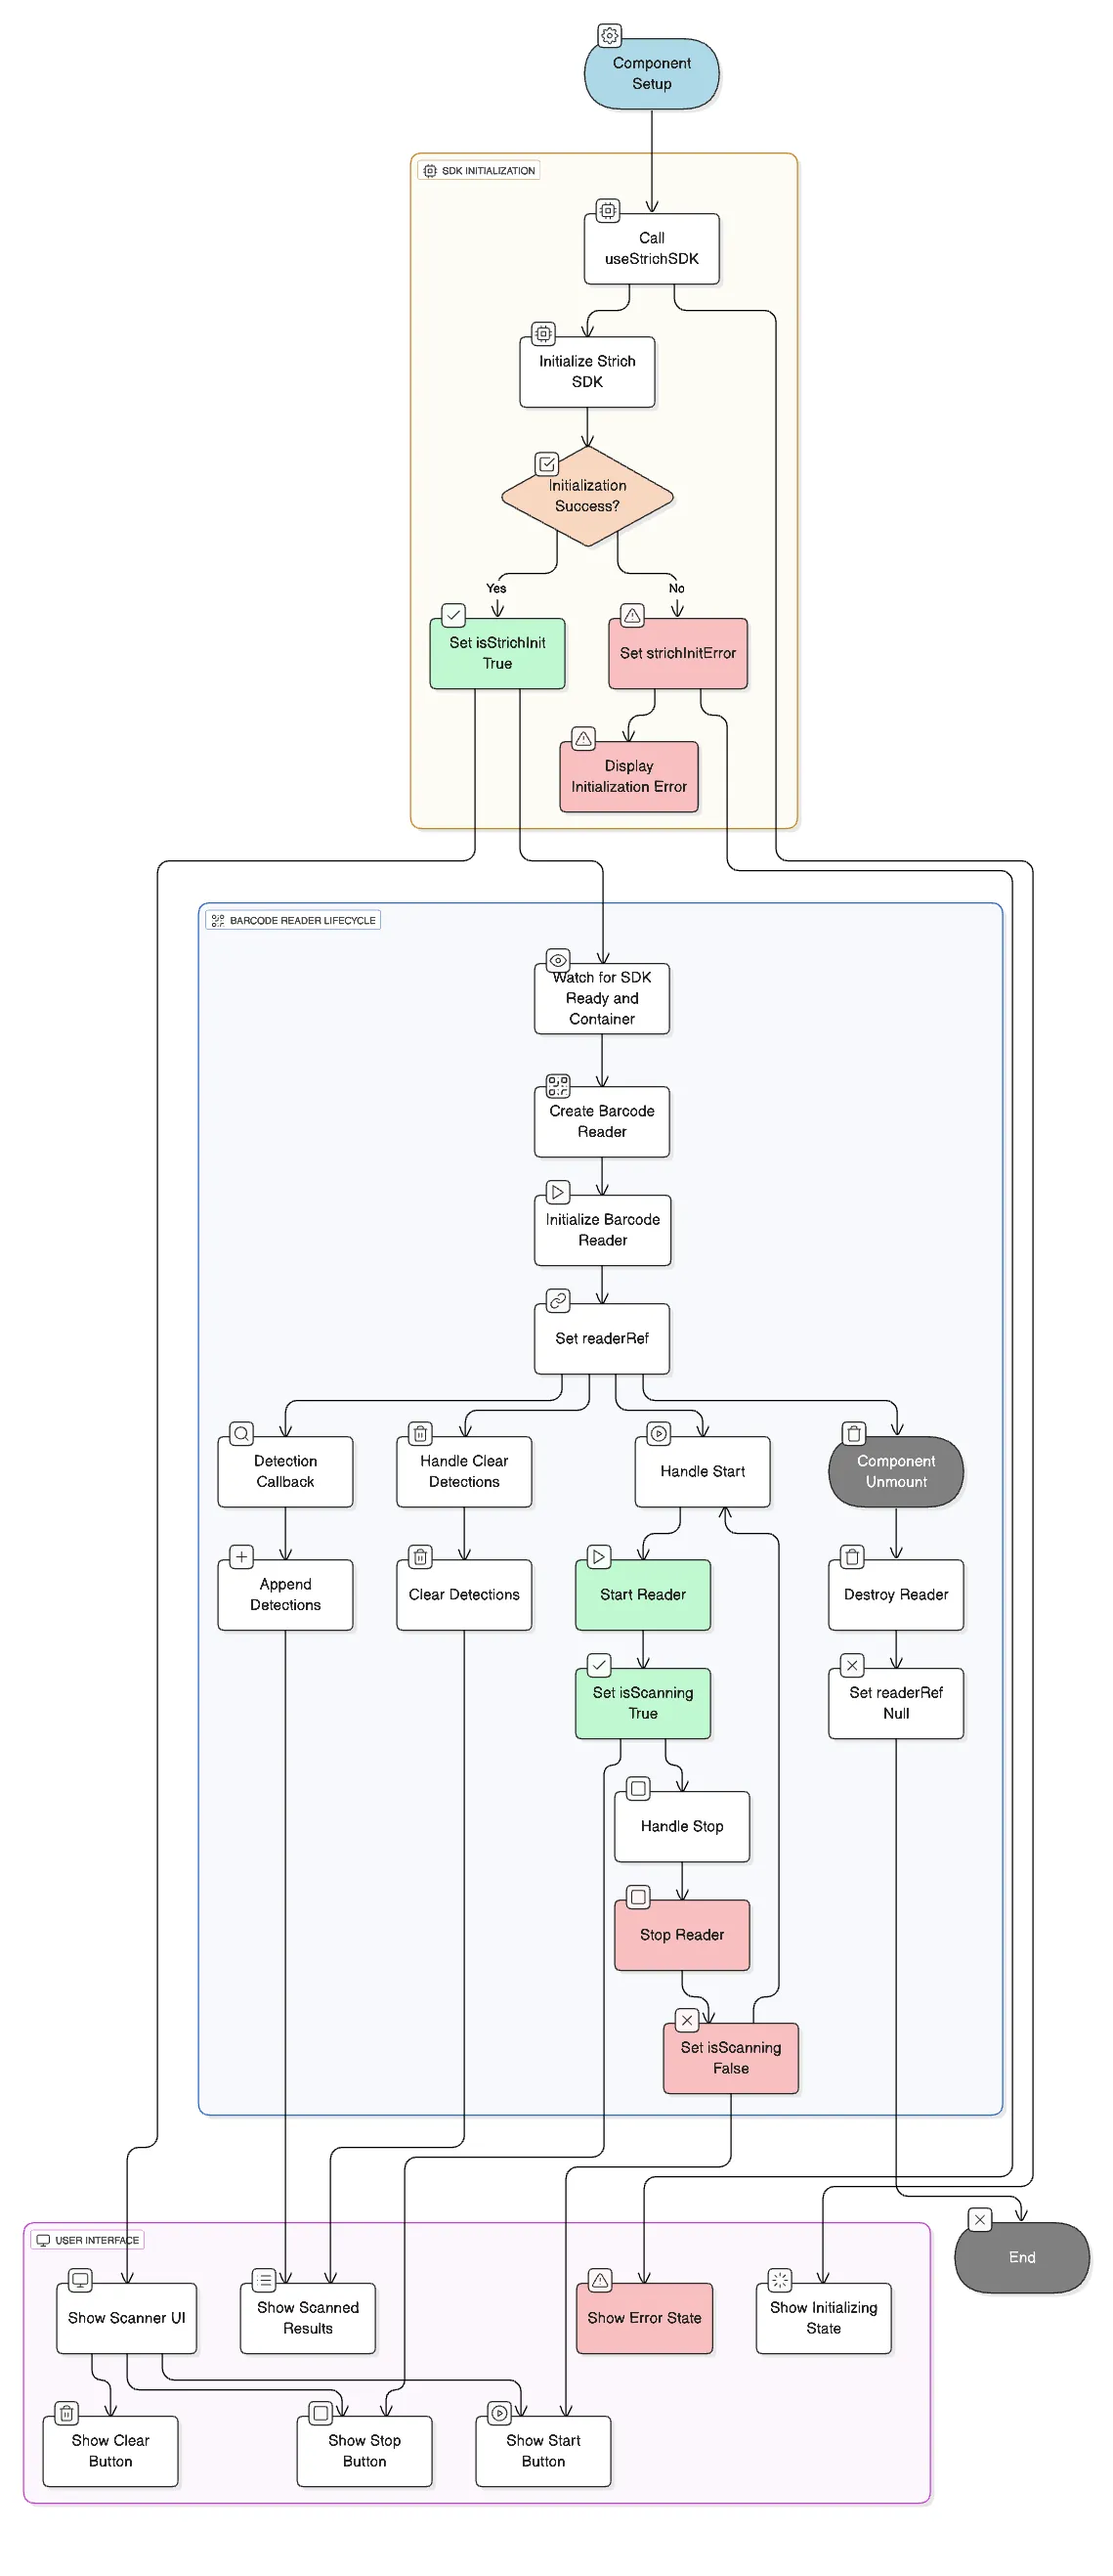
How It All Works Together
Here’s the complete flow:
- First, the STRICH SDK is initialized using your license key
- Once the SDK is ready, the component waits for the scanner container (the
<div>where the camera will show) to appear - When both are ready, a BarcodeReader is created and attached to that container
- The reader is then initialized, which activates the camera and prepares it for scanning.
- When the user clicks Start, the reader begins scanning barcodes
- Every time a barcode is detected, it is added to the detections list so you can show results on the screen
- When the user clicks Stop, the scanner stops
- The Clear button removes all old scanned results
- If the user leaves the page or the component is destroyed, the reader is cleanly removed, freeing the camera
Complete Code of BarcodeScanner Component
<script setup lang="ts">
import { BarcodeReader, type CodeDetection } from "@pixelverse/strichjs-sdk";
import { ref, onUnmounted, watch } from "vue";
import { useStrichSDK } from "../composables/useStrichSDK";

const { isStrichInit, strichInitError } = useStrichSDK(
  import.meta.env.VITE_STRICH_LICENSE_KEY
);

const scannerContainerRef = ref<HTMLDivElement | null>(null);
const readerRef = ref<BarcodeReader | null>(null);
const detections = ref<CodeDetection[]>([]);
const isScanning = ref(false);

watch([isStrichInit, scannerContainerRef], async (initialized) => {
  if (initialized && scannerContainerRef.value) {
    const reader = new BarcodeReader({
      selector: scannerContainerRef.value,
    });

    const instance = await reader.initialize();
    readerRef.value = instance;

    instance.detected = (newDetections) => {
      detections.value = [...detections.value, ...newDetections];
    };
  }
});

const handleStart = async () => {
  if (readerRef.value && !isScanning.value) {
    try {
      await readerRef.value.start();
      isScanning.value = true;
    } catch (error) {
      console.error("Failed to start scanner:", error);
    }
  }
};

const handleStop = async () => {
  if (readerRef.value && isScanning.value) {
    try {
      await readerRef.value.stop();
      isScanning.value = false;
    } catch (error) {
      console.error("Failed to stop scanner:", error);
    }
  }
};

const clearDetections = () => {
  detections.value = [];
};

onUnmounted(() => {
  if (readerRef.value) {
    readerRef.value.destroy();
    readerRef.value = null;
  }
});
</script>

<template>
  <div class="max-w-xl text-center mx-auto py-4 px-4">
    <h2 class="text-2xl font-bold mb-5">Barcode Scanner</h2>

    <div v-if="strichInitError" class="text-red-600">
      Error initializing scanner: {{ strichInitError.message }}
    </div>

    <div v-else-if="!isStrichInit" class="text-gray-600">
      Initializing scanner...
    </div>

    <div v-else class="flex flex-col">
      <div
        ref="scannerContainerRef"
        id="scanner"
        class="relative min-h-40 border-2 border-gray-300 rounded"
      ></div>

      <div class="actions mt-4 flex gap-2 justify-center">
        <button
          @click="handleStart"
          :disabled="isScanning"
          class="px-4 py-2 bg-green-500 text-white rounded disabled:bg-gray-300 disabled:cursor-not-allowed"
        >
          {{ isScanning ? "Scanning..." : "Start Scanner" }}
        </button>

        <button
          @click="handleStop"
          :disabled="!isScanning"
          class="px-4 py-2 bg-red-500 text-white rounded disabled:bg-gray-300 disabled:cursor-not-allowed"
        >
          Stop Scanner
        </button>

        <button
          @click="clearDetections"
          class="px-4 py-2 bg-blue-500 text-white rounded"
        >
          Clear Results
        </button>
      </div>
    </div>

    <div class="results mt-6">
      <h3 v-if="detections.length > 0" class="text-xl font-semibold mb-3">
        Scanned Barcodes:
      </h3>
      <div
        v-for="(detection, index) in detections"
        :key="index"
        class="p-2 mb-2 bg-gray-100 rounded"
      >
        {{ detection.data }}
      </div>
    </div>
  </div>
</template>
You can easily bring this component into your project wherever you want to showcase the scanner functionality. It’s as simple as that!
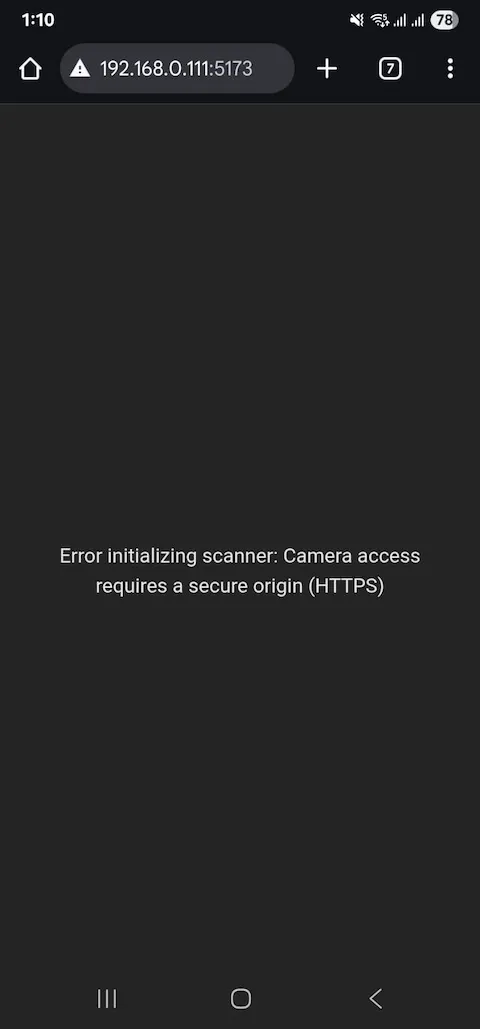
Most Important Key Point
Your application must run on HTTPS to access the camera. Browsers block camera access on unsecured connections. Set up a tunnel locally using ngrok, DevTunnels, or Cloudflare tunnel. It’s very easy to set up, you can follow the related docs or a YouTube video.
Final Words
You now have a fully functional barcode scanner integrated into your Vue application. The implementation serves as a starting point and can be customized to meet your specific business requirements.
For more advanced implementations and framework-specific examples:
FAQs
Why isn’t the scanner loading?
Check these common issues:
- Verify your license key is correct, properly stored in .env, and not expired.
- Ensure you’re running on HTTPS (camera access requirement)
- Check the browser console for any initialization errors or failed API calls.
- Verify that
@pixelverse/strichjs-sdkis installed correctly.
Why am I getting “Camera access denied”?
The user needs to grant camera permissions. It happens when:
- The browser hasn’t requested permissions yet
- User or browser blocked camera access in the past
- You’re running on HTTP instead of HTTPS (browsers block camera on insecure connections)
- Another application or browser tab is currently using the camera