Published on: Tue Aug 05 2025 by Shan Asif
Want to turn your React app into a powerful barcode scanner? If you’re building an inventory system, a retail POS, or a simple product lookup tool. This guide will walk you through the exact steps to add barcode scanning using your web browser’s camera.
No native app. No extra devices. Just your browser.
We’ll keep it simple, clean, and production-ready. So, you can add barcode scanning to any React web application out there.
Demo Video:
Let’s get started.
In this tutorial, we are using:
- Vite (Build Tool): If you are using Parcel, create-react-app, or any other build tool. You can follow this guide, since build tools like Vite are only utilities that optimize, bundle, and serve your code for faster development and efficient production deployment.
- STRICH SDK (Barcode Scanner): A JavaScript library for real-time barcode scanning in the web browser.
- TailwindCSS: A ****utility-first CSS framework that lets you build custom designs quickly using pre-defined classes. It’s just for quick styling of action buttons like start or stop scanning. Of course, you can use custom CSS.
Basic Setup
If you are implementing in your existing project, then you can skip this step.
Create a project directory with any name; I am using “barcode-scanner” as my project name.
Now, follow the Vite Guide for installation and prerequisites; they have a pretty neat docs.
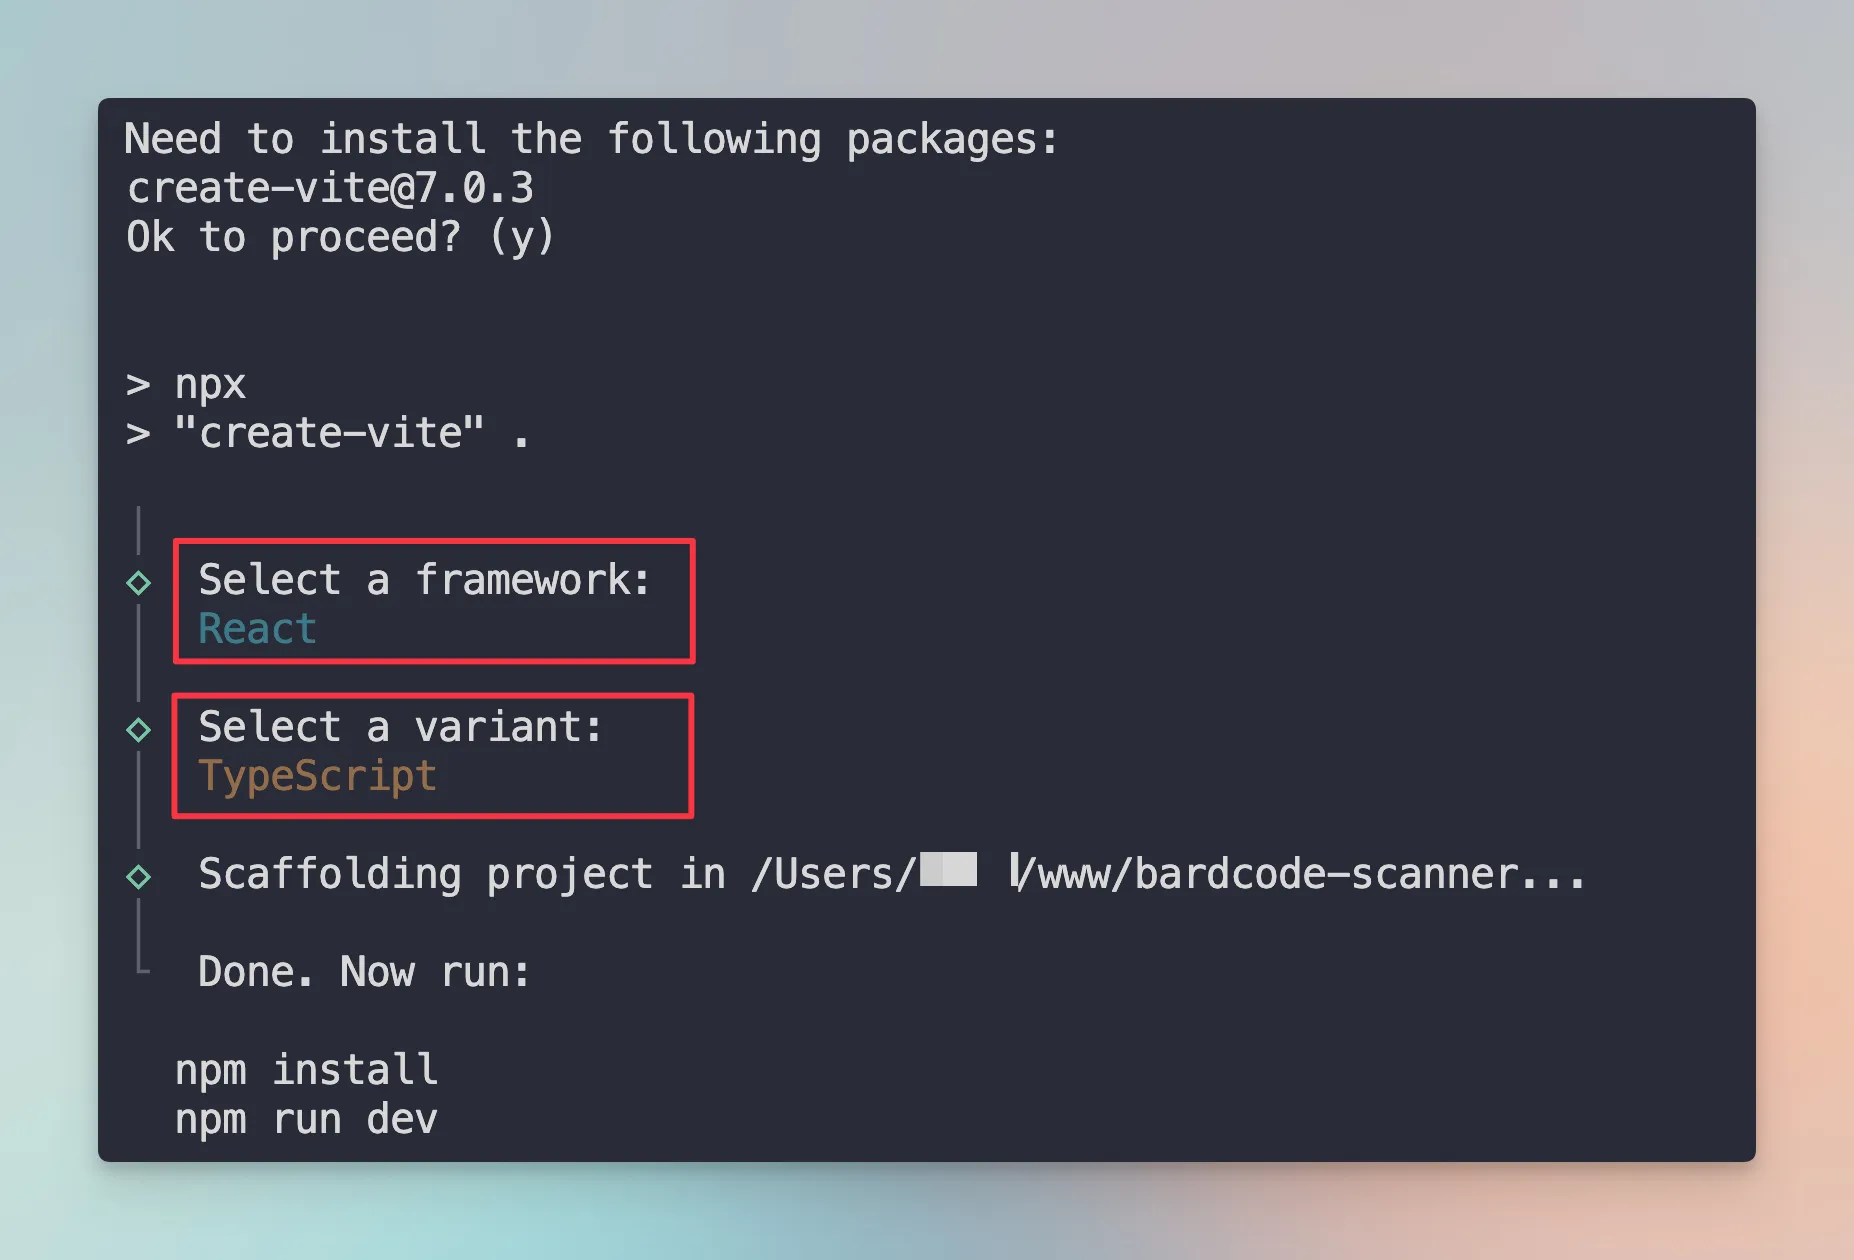
For our case, this command is enough to set things up:
npm create vite@latest .
I added a period (.) at the end to set up Vite in the current directory.
Once you run the command, you will be asked to select the framework and the variant.
Just select ReactJS and TypeScript.
Next, you can follow Tailwind CSS with Vite (a very quick guide).
STRICH SDK Overview and Installation
STRICH is a client-side JavaScript SDK for integrating real-time barcode scanning into your web applications.
You can integrate this into any web application to enable it to use a device’s camera for scanning and reading different types of barcodes. It includes common 1D barcodes, such as those found on product packaging, as well as 2D barcodes, like QR codes.
Note: If you want to get an idea of how STRICH works, open this demo link on your mobile and start scanning any QR or bar code.
The main idea behind STRICH is to make barcode scanning accessible directly through a web browser, eliminating the need for users:
- To download and install a separate native application on their smartphones.
- To buy a dedicated scanner device for their stores
It is beneficial for businesses as it simplifies the process for their customers or employees.
You can run npm i @pixelverse/strichjs-sdk to install strich as a package inside your ReactJS project.
Once installed, the first step is initialization of the strich with the license key. You can grab your license from dashboard.
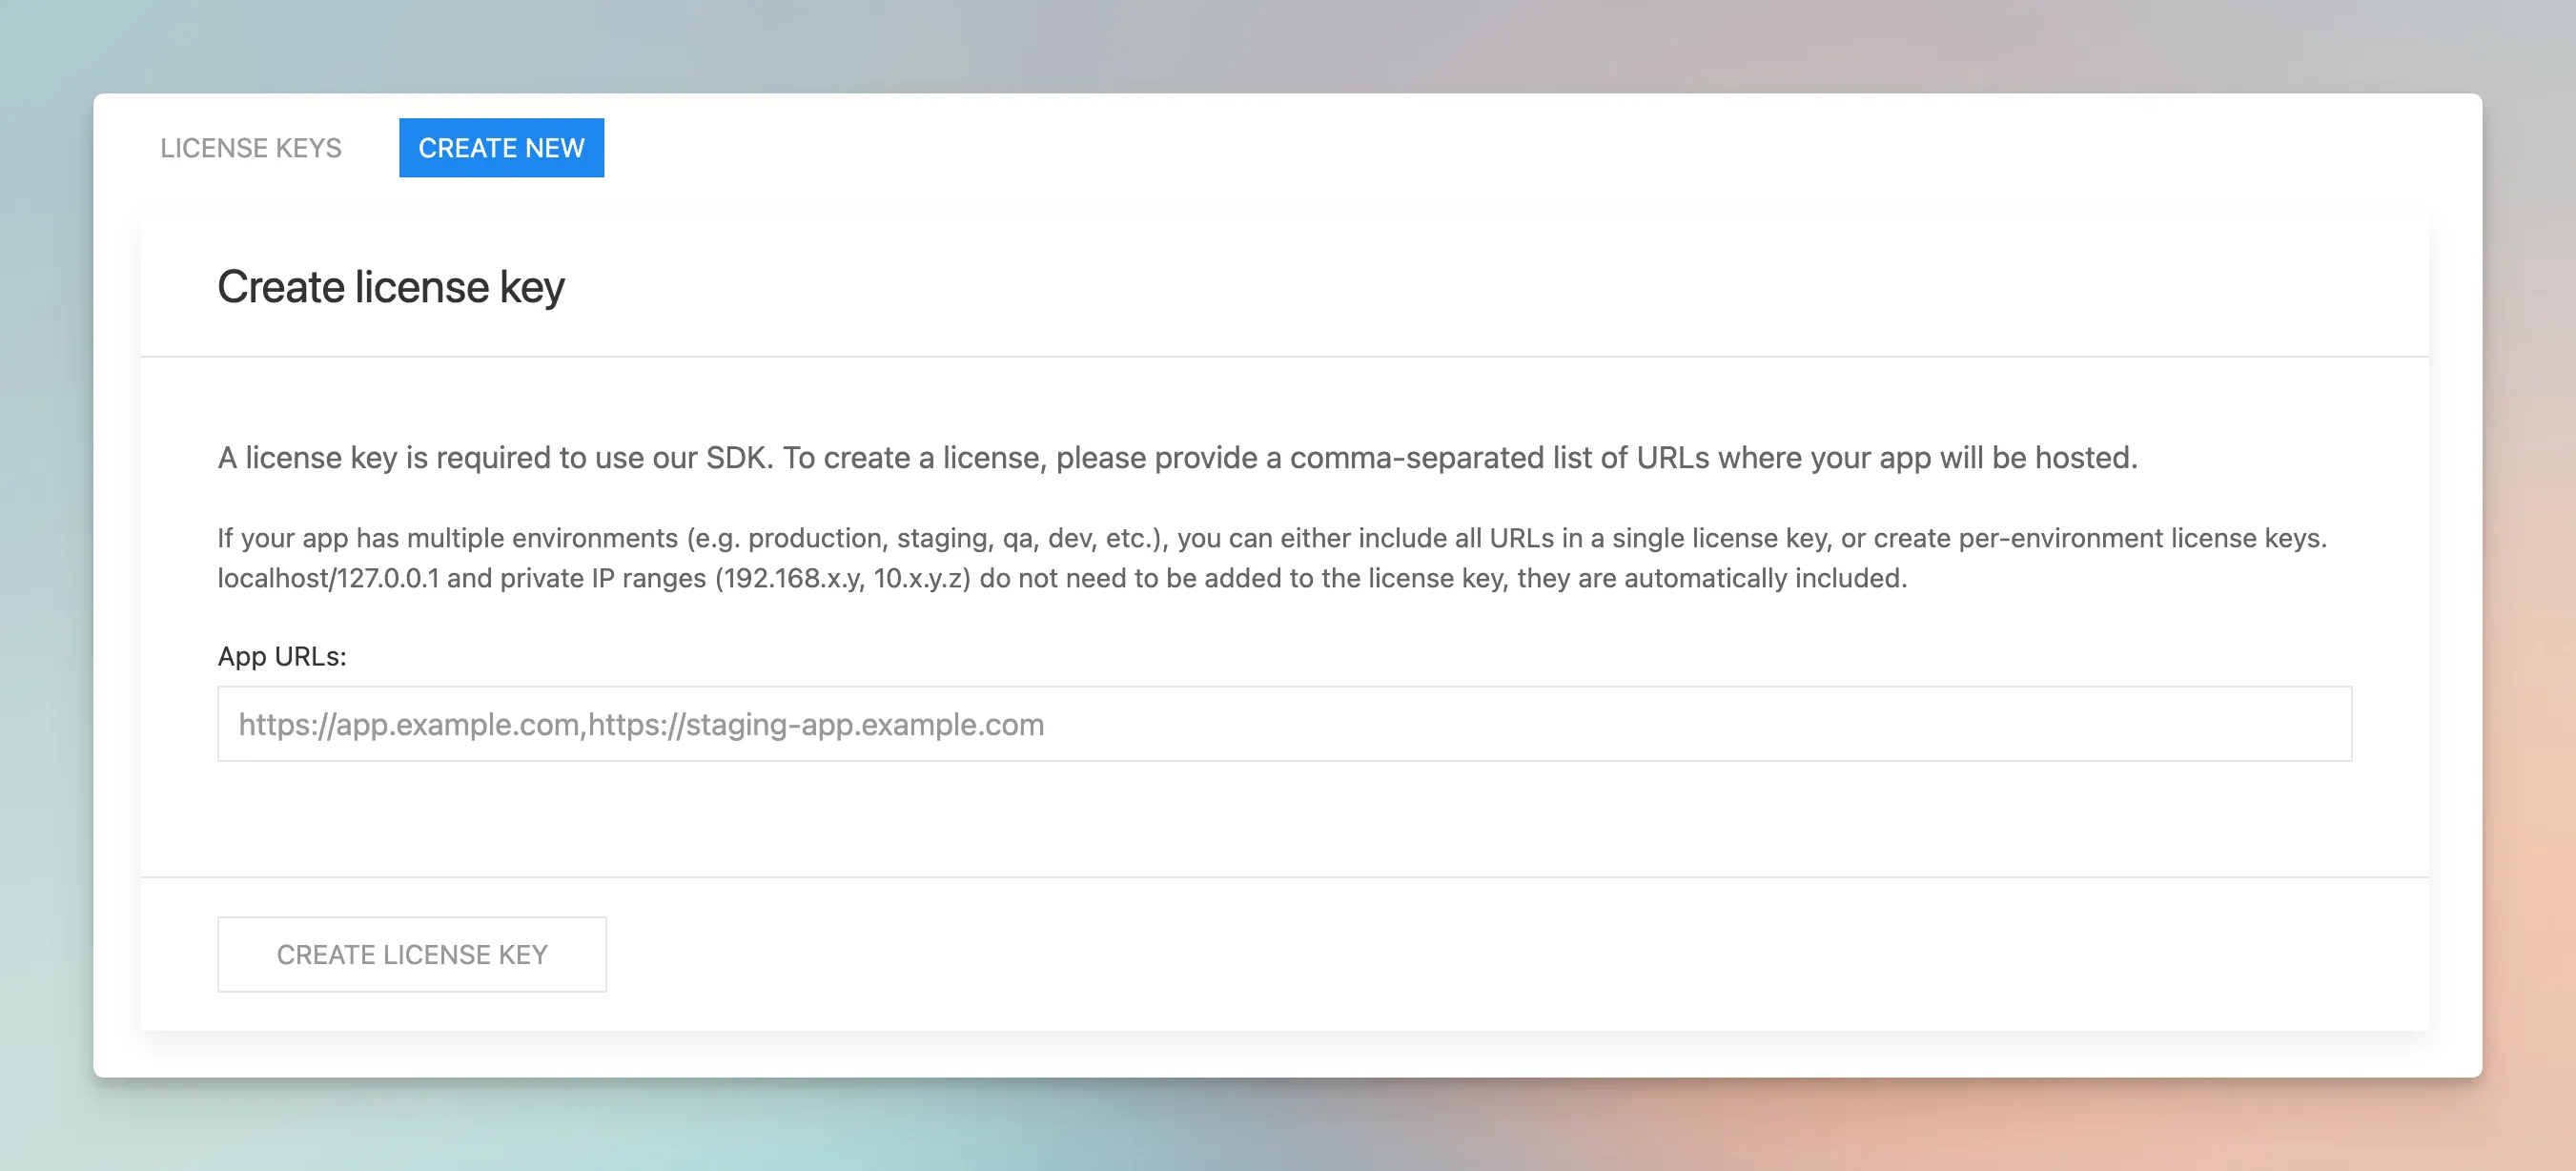
- Create a new license key and copy it.
- Now, create a .env file inside your project root directory with a variable VITE_STRICH_LICENSE_KEY and store your license key inside it.
Note: You can name it whatever you want, but make sure to put the VITE prefix before the variable.
VITE_STRICH_LICENSE_KEY="eyJhbGciOiJIUzI1.....zR96Bc"
The next step is to create a custom React hook.
Custom hooks are just regular functions in React that allow you to reuse logic across components. They usually don’t return JSX (UI), but rather data or functions you can use in your components.
So, we need a custom hook to initialize the Strich SDK. For that, you can create a hooks directory in your src folder with the useStrichSDK.ts file inside it.
The goal of the useStrichSDK hook is to let components know when the SDK is ready or if errors occurred.
import { SdkError, STRICHSDK } from "@pixelverse/strichjs-sdk";
import { useEffect, useState } from "react";

const useStrichSDK = (licenseKey: string) => {
  const [isStrichInit, setIsStrichInit] = useState(false);
  const [strichInitError, setStrichInitError] = useState<SdkError | Error>();
  useEffect(() => {
    const initializeStrich = async () => {
      try {
        await StrichSDK.initialize(licenseKey);
        setIsStrichInit(true);
      } catch (error) {
        // Type guard to check if it's an SdkError
        if (error instanceof SdkError) {
          setStrichInitError(error);
          console.error("Strich SDK initialization failed:", error);
        } else {
          // Handle other types of errors
          setStrichInitError(
            new Error("Unknown error occurred during SDK initialization")
          );
        }
      }
    };

    initializeStrich();
  }, [licenseKey]);

  return { isStrichInit, strichInitError };
};

export default useStrichSDK;
Here are the quick key steps for this custom hook:
- Accept the license key as a parameter
- Initialize state variables:
isStrichInit(boolean) - tracks if SDK is readystrichInitError(SdkError | Error) - stores any initialization errors
- Run initialization effect when component mounts or license key changes:
- Call
StrichSDK.initialize(licenseKey) - On success: set
isStrichInittotrue - On error: set
strichInitErrorwith proper error type
- Call
- Return state object with initialization status and any errors
It’s time to create our main component. Don’t get confused, I will explain every single step we are taking, so you can integrate it into any project quickly.
Create a components folder in src directory with BarcodeScanner.tsx inside it.
Imports
import { BarcodeReader, type CodeDetection } from "@pixelverse/strichjs-sdk";
import { useEffect, useRef, useState } from "react";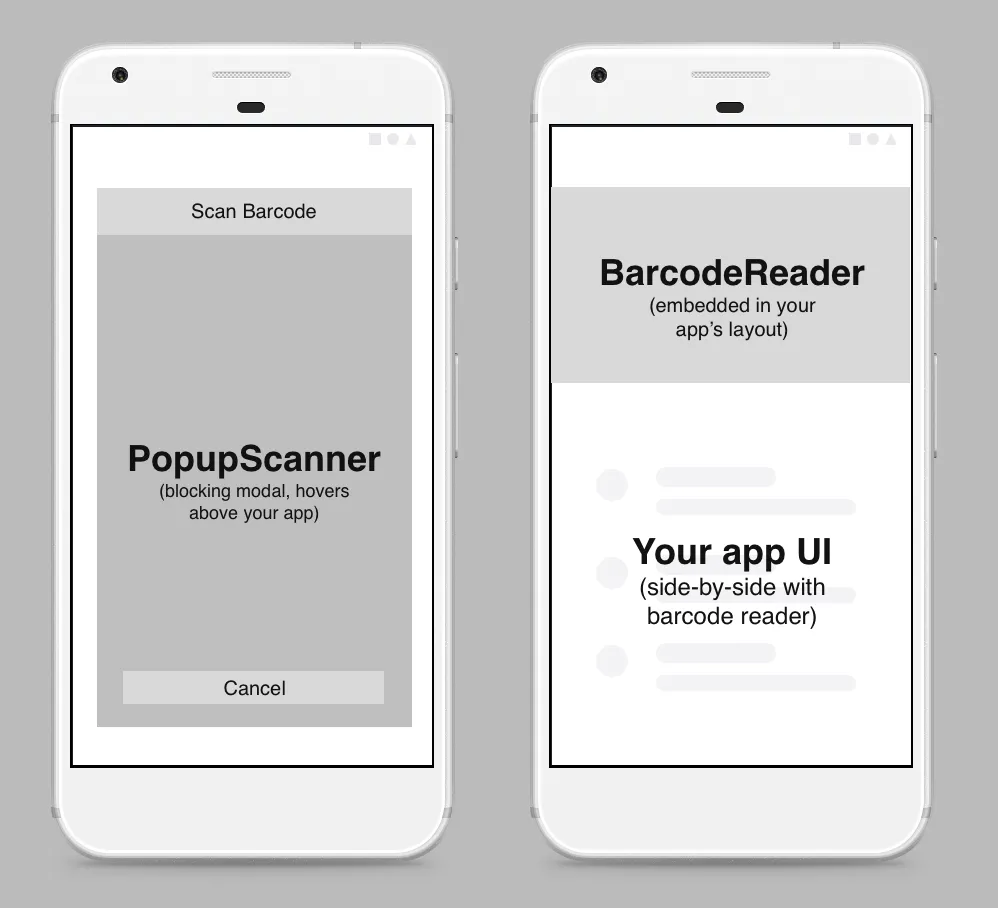
import useStrichSDK from "../hooks/useStrichSDK";- STRICH supports two types of integrations: BarcodeReader and PopupScanner. We’re using BarcodeReader.
- Import Basic react hooks for component lifecycle and state management
- useStrichSDK: The initialization custom hook that we created in the previous step.
Component Setup & State
const BarcodeScanner = () => {
  const { isStrichInit, strichInitError } = useStrichSDK(
    import.meta.env.VITE_STRICH_LICENSE_KEY
);- Create the functional component BarcodeScanner
- Uses the custom hook to initialize the STRICH SDK with a license key from environment variables
- Gets back initialization status and any errors
Refs and State Variables
const readerRef = useRef<BarcodeReader | null>(null);
const scannerContainerRef = useRef<HTMLDivElement>(null);
const [detections, setDetections] = useState<CodeDetection[]>([]);
const [isScanning, setIsScanning] = useState(false);readerRef: Holds reference to the BarcodeReader instancescannerContainerRef: References the DOM element where the camera view will be displayeddetections: Array storing all detected barcodesisScanning: Boolean tracking whether scanning is currently active
Main Effect Hook - Scanner Setup
useEffect(() => {
  if (!isStrichInit || !scannerContainerRef.current) return;

  const reader = new BarcodeReader({
    selector: scannerContainerRef.current,
  });

  reader.initialize().then((instance) => {
    readerRef.current = instance;

    instance.detected = (detections) => {
      setDetections((prev) => [...prev, ...detections]);
    };
  });

  return () => {
    readerRef.current?.destroy();
    readerRef.current = null;
  };
}, [isStrichInit]);
This is the core setup logic:
- Waits for SDK initialization and DOM element to be ready
- Creates a new BarcodeReader instance, telling it which DOM element to use
- Initializes the reader (sets up camera, etc.)
- Sets up detection callback: when barcodes are found, add them to the detections array
- Cleanup function: destroys the reader when the component unmounts
Early Return Conditions
if (strichInitError) {
  return <div>Error initializing scanner: {strichInitError.message}</div>;
}

if (!isStrichInit) {
  return <div>Initializing scanner...</div>;
}- Shows an error message if the SDK failed to initialize
- Shows a loading message while SDK is initializing
Control Functions
const handleStart = async () => {
  if (readerRef.current && !isScanning) {
    try {
      await readerRef.current.start();
      setIsScanning(true);
    } catch (error) {
      console.error("Failed to start scanner:", error);
    }
  }
};- Starts the camera and barcode detection
- Updates the scanning state
- Includes error handling
const handleStop = async () => {
  if (readerRef.current && isScanning) {
    try {
      await readerRef.current.stop();
      setIsScanning(false);
    } catch (error) {
      console.error("Failed to stop scanner:", error);
    }
  }
};- Stops the camera and detection
- Updates the scanning state
const clearDetections = () => {
  setDetections([]);
};- Simple function to clear all detected barcodes from the display
Render Method
return (
  <div>
    <h2 className="text-2xl font-bold mb-5">Barcode Scanner</h2>
    <div className="flex flex-col">
      <div
        ref={scannerContainerRef}
        id="scanner"
        className="relative max-w-2xl min-h-40 border-2 border-gray-300 rounded"
></div>- Header and container for the camera view
- The
scannerContainerRefdiv is where the camera feed will appear
<div className="actions mt-4 flex gap-2 justify-center">
  <button
    onClick={handleStart}
    disabled={isScanning}
    className="px-4 py-2 bg-green-500 text-white rounded disabled:bg-gray-300 disabled:cursor-not-allowed"
  >
    {isScanning ? "Scanning..." : "Start Scanner"}
  </button>
  // ... other buttons
</div>- Control buttons with conditional styling and text
- Buttons are disabled based on the current scanning state
<div className="results">
  {detections?.map((detection, index) => (
    <div key={index}>{detection.data}</div>
  ))}
</div>- Displays all detected barcode data
- Each detection shows its data content
How It All Works Together
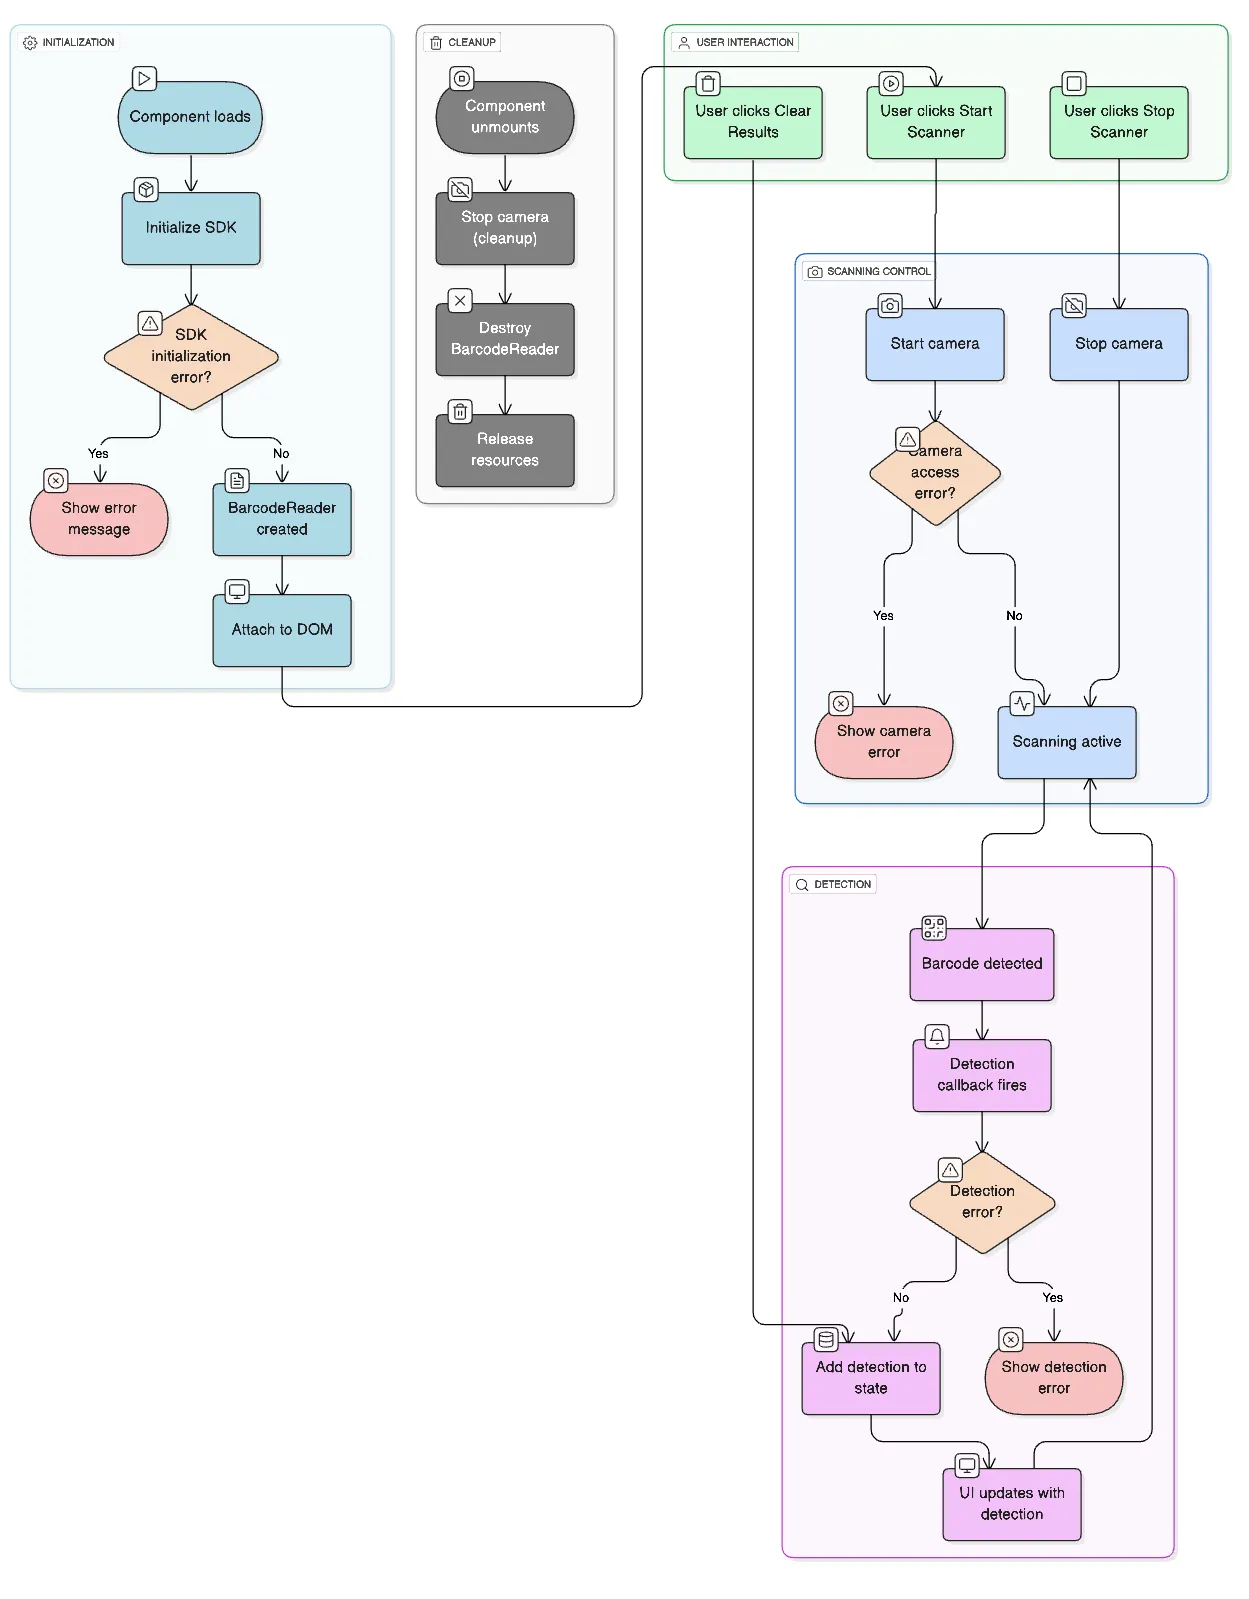
- Initialization: Component loads → SDK initializes → BarcodeReader is created
- User Interaction: User clicks “Start Scanner” → Camera activates → Scanning begins
- Detection: When barcode is found →
detectedcallback fires → Detection added to state → UI updates - Control: User can start/stop scanning and clear results as needed
- Cleanup: When component unmounts → Camera stops → Resources are cleaned up
Complete Code of BarcodeScanner Component
import { BarcodeReader, type CodeDetection } from "@pixelverse/strichjs-sdk";
import { useEffect, useRef, useState } from "react";
import useStrichSDK from "../hooks/useStrichSDK";

const BarcodeScanner = () => {
  const { isStrichInit, strichInitError } = useStrichSDK(
    import.meta.env.VITE_STRICH_LICENSE_KEY
  );

  const readerRef = useRef<BarcodeReader | null>(null);
  const scannerContainerRef = useRef<HTMLDivElement>(null);
  const [detections, setDetections] = useState<CodeDetection[]>([]);
  const [isScanning, setIsScanning] = useState(false);

  // Setup Barcode Reader once initialized
  useEffect(() => {
    if (!isStrichInit || !scannerContainerRef.current) return;

    const reader = new BarcodeReader({
      selector: scannerContainerRef.current,
    });

    reader.initialize().then((instance) => {
      readerRef.current = instance;

      instance.detected = (detections) => {
        setDetections((prev) => [...prev, ...detections]);
      };
    });

    return () => {
      readerRef.current?.destroy();
      readerRef.current = null;
    };
  }, [isStrichInit]);

  if (strichInitError) {
    return <div>Error initializing scanner: {strichInitError.message}</div>;
  }

  if (!isStrichInit) {
    return <div>Initializing scanner...</div>;
  }

  const handleStart = async () => {
    if (readerRef.current && !isScanning) {
      try {
        await readerRef.current.start();
        setIsScanning(true);
      } catch (error) {
        console.error("Failed to start scanner:", error);
      }
    }
  };
  const handleStop = async () => {
    if (readerRef.current && isScanning) {
      try {
        await readerRef.current.stop();
        setIsScanning(false);
      } catch (error) {
        console.error("Failed to stop scanner:", error);
      }
    }
  };
  const clearDetections = () => {
    setDetections([]);
  };
  return (
    <div>
      <h2 className="text-2xl font-bold mb-5">Barcode Scanner</h2>
      <div className="flex flex-col">
        <div
          ref={scannerContainerRef}
          id="scanner"
          className="relative max-w-2xl min-h-40 border-2 border-gray-300 rounded"
        ></div>

        <div className="actions mt-4 flex gap-2 justify-center">
          <button
            onClick={handleStart}
            disabled={isScanning}
            className="px-4 py-2 bg-green-500 text-white rounded disabled:bg-gray-300 disabled:cursor-not-allowed"
          >
            {isScanning ? "Scanning..." : "Start Scanner"}
          </button>

          <button
            onClick={handleStop}
            disabled={!isScanning}
            className="px-4 py-2 bg-red-500 text-white rounded disabled:bg-gray-300 disabled:cursor-not-allowed"
          >
            Stop Scanner
          </button>

          <button
            onClick={clearDetections}
            className="px-4 py-2 bg-blue-500 text-white rounded"
          >
            Clear Results
          </button>
        </div>
      </div>
      <div className="results">
        {detections?.map((detection, index) => (
          <div key={index}>{detection.data}</div>
        ))}
      </div>
    </div>
  );
};

export default BarcodeScanner;
Now, you can import this component where you want to show the scanner functionality; that’s it.
Most Important Key Point
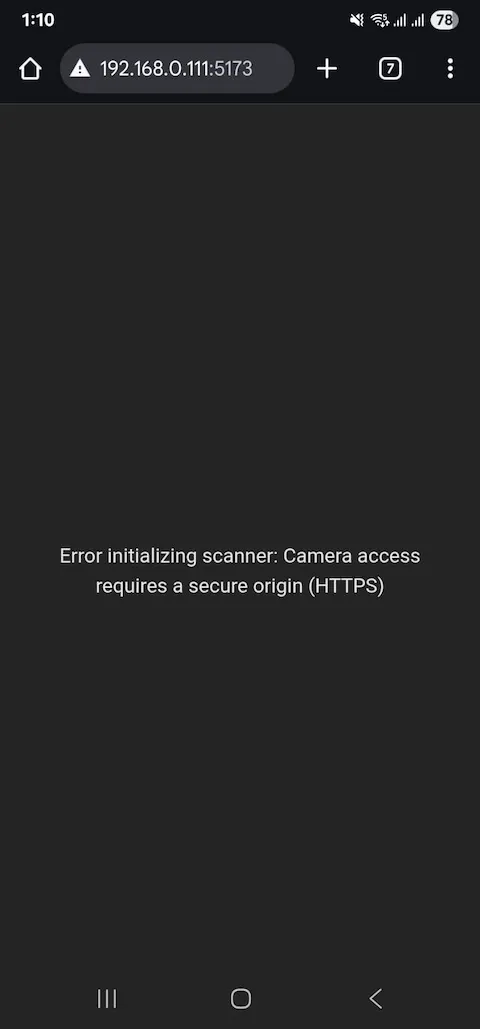
Camera needs a secure connection (https). For local testing, you need to have SSL installed for the domain. You can set up a tunnel locally using ngrok, DevTunnels, or Cloudflare tunnel. It’s very easy to set up, follow the related docs or a YouTube video.
Final Words
With this implementation, you have a fully functional barcode scanner. Consider adding features like detection filtering, export functionality, or integration with your backend API based on your specific requirements.
You can explore demo code samples for various frameworks, including Angular, Vue, and more.
FAQs
Why isn’t the scanner loading?
Check these common issues:
- Verify your license key is correct and not expired
- Ensure you’re running on HTTPS (camera access requirement)
- Check browser console for initialization errors
- Confirm the
useStrichSDKhook is properly implemented
Why am I getting “Camera access denied”?
The user needs to grant camera permissions. This happens when:
- First time visiting the site
- Permissions were previously denied
- Running on HTTP instead of HTTPS
- Camera is being used by another application