Published on: Tue Dec 17 2024 by Alex Suzuki
Motivation
Recently one of my customers approached me with a feature request for STRICH that I think makes a lot of sense.
Instead of just drawing a rectangle (called “Viewfinder”) over the region where barcodes are detected, the region outside of the rectangle should also be dimmed, steering user focus to where the action is.
| Before | After |
|---|---|
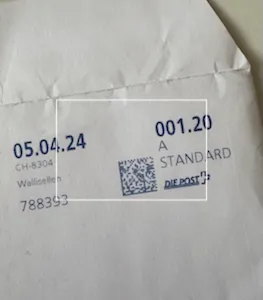 | 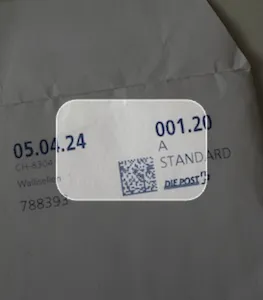 |
My first reaction was: this is easy! The rectangle is drawn on a canvas that is layered on top of the camera feed. Surely we can colorize the outside area by clipping the inside area.
Clipping
My first approach was to define the rectangle as the clipping path using the clip method, then fill the entire canvas with a semi-transparent color (black with 50% opacity in this example).
  const ctx = canvas.getContext('2d');
  ctx.beginPath();
  ctx.rect((canvas.width - rectW)/2, (canvas.height - rectH)/2, rectW, rectH);
  ctx.clip();
  ctx.fillStyle = 'rgba(0,0,0,0.5)';
  ctx.fillRect(0, 0, canvas.width, canvas.height);
Which lead to the following result:
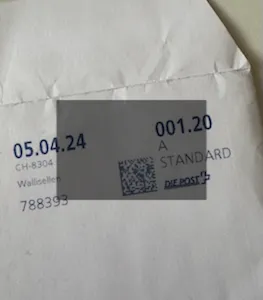
Ok, that didn’t work out. clip() actually works the other way round! Whatever we do to the canvas will be restricted to the clip path. What I wanted instead was “do the thing everywhere except here”, but a quick check of MDN didn’t yield anything useful – there’s no such thing as an “inverse clip”.
So what can we do?
Raw Dogging It
We could fill each of the four outside rectangles individually.
  const ctx = canvas.getContext('2d');
  ctx.fillStyle = 'rgba(0,0,0,0.5)'; // top
  ctx.fillRect(0, 0, canvas.width, (canvas.height - rectH)/2);
  ctx.fillStyle = 'rgba(255,0,0,0.5)'; // bottom
  ctx.fillRect(0, (canvas.height + rectH)/2, canvas.width, (canvas.height - rectH)/2);
  ctx.fillStyle = 'rgba(0,255,0,0.5)'; // left
  ctx.fillRect(0, rectH, (canvas.width - rectW)/2, rectH);
  ctx.fillStyle = 'rgba(0,0,255,0.5)'; // right
  ctx.fillRect((canvas.width + rectW)/2, rectH, (canvas.width - rectW)/2, rectH);
Here I’ve used separate colors for every region to make it clear what’s happening.
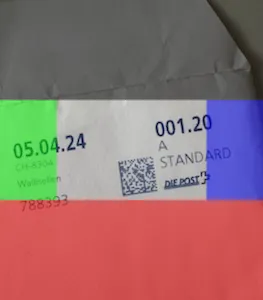
Not exactly elegant, but better than nothing!
Fill and Clear
The solution turned out to be surprisingly simple. Fill the entire canvas, and then use clearRect to erase the contents of the rectangle, thus making it transparent.
  const ctx = canvas.getContext('2d');
  ctx.fillStyle = 'rgba(0,0,0,0.5)';
  ctx.fillRect(0, 0, canvas.width, canvas.height);
  ctx.clearRect((canvas.width - rectW)/2, (canvas.height - rectH)/2, rectW, rectH);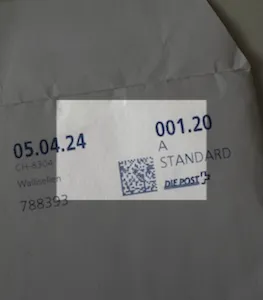
🥊 We’ve successfully punched a hole in this canvas!
Plot Twist: Rounded Rect Rears its Ugly Head
You may have noticed that I cheated a little. The mockup used rounded corners instead of sharp ones for the rectangle. Turns out that Canvas has a roundRect method that complements the rect method, hooray!
So let’s call clearRoundRect() and we should be good to go, right?

Oh no – there’s no way of clearing a rounded rectangle! Seems like rounded rectangles are not a first-class citizen yet in the Canvas API.
But worry not… remember that old friend clip that we shunned earlier and felt enlightened because we thought we didn’t need it? We need its help after all. We can use clip to limit the effect of clearRect to a rounded rectangle clipping path!
  const ctx = canvas.getContext("2d");
  ctx.fillStyle = 'rgba(0,0,0,0.5)';
  ctx.fillRect(0, 0, canvas.width, canvas.height);
  ctx.roundRect((canvas.width - rectW)/2, (canvas.height - rectH)/2, rectW, rectH, 20);
  ctx.clip(); // restrict clearRect to the roundRect clipping path
  ctx.clearRect((canvas.width - rectW)/2, (canvas.height - rectH)/2, rectW, rectH);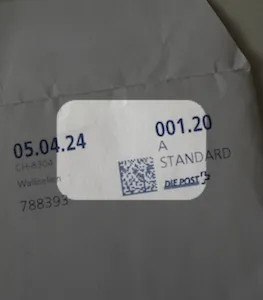
Finally – A cutout in the form of a rounded rectangle!
Drawing the Border
All that’s left is drawing the border around the rounded cutout. That’s just another call to roundRect, but we need to remove the clipping path first, otherwise it will clip the stroke.
As there’s no way to directly remove a clipping path, so we need to use the save and restore methods to revert the canvas to its state before the clipping path was activated.
The final code:
  const ctx = canvas.getContext("2d");

  // draw the transparent overlay with a rounded rectangle cutout
  ctx.save();
  ctx.fillStyle = 'rgba(0,0,0,0.5)';
  ctx.fillRect(0, 0, canvas.width, canvas.height);
  ctx.roundRect((canvas.width - rectW)/2, (canvas.height - rectH)/2, rectW, rectH, 20);
  ctx.clip();
  ctx.clearRect((canvas.width - rectW)/2, (canvas.height - rectH)/2, rectW, rectH);
  ctx.restore(); // revert canvas (remove clipping path)

  // draw the frame
  ctx.strokeStyle = 'white';
  ctx.lineWidth = 2;
  ctx.roundRect((canvas.width - rectW)/2, (canvas.height - rectH)/2, rectW, rectH, 20);
  ctx.stroke();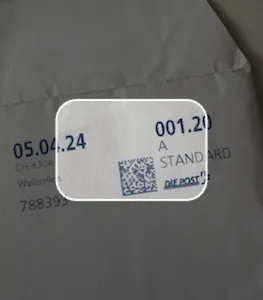
Success! We made a customer happy and learned something along the way.
Be careful with roundRect, it’s only been been widely available since early 2023, so still relatively new. In my case, I added graceful degradation to rect – sad panda eyes for lovers of both rounded rectangles and vintage browsers.